Sanding Sponge vs Sandpaper for Drywall
Sanding sponge vs sandpaper for drywall is a common choice for small wall repairs, and the best option depends on the size of the patch, the shape of the surface, and how much control you need.
For most beginner homeowners, a sanding sponge is easier for small drywall patches because it is simple to hold, spreads pressure more evenly, and works well around edges and corners. Sandpaper is still useful, especially on flat areas or when wrapped around a sanding block.
The safest approach is to use the least aggressive sanding tool that will smooth the repair. Drywall patches usually need light sanding, not heavy sanding.
Sanding Sponge vs Sandpaper for Drywall: Quick Comparison
| Tool | Best For | Main Advantage | Main Caution |
|---|---|---|---|
| Sanding sponge | Small patches, corners, touch-ups | Easy to control | Can round edges if overused |
| Sandpaper sheet | Flat areas, custom use | Flexible and inexpensive | Harder to control by hand |
| Sanding block | Flat raised patches | Keeps surface flatter | Can oversand if pressed hard |
| Angled sanding sponge | Corners and trim edges | Better detail control | Use light pressure |
If you are fixing nail holes, small dents, or minor spackle repairs, start with a fine-grit sanding sponge. If you are leveling a larger flat patch, sandpaper on a sanding block may give you better control over the flat surface.
What Is a Sanding Sponge?
A sanding sponge is a foam block with abrasive material on the outside.
It feels like a flexible sanding block. The sponge shape makes it easy to grip, and the slight give helps it follow small wall variations. This is one reason sanding sponges are popular for drywall patches and small home repairs.
Sanding sponges are useful for:
- Nail hole repairs
- Small dents
- Spackle patches
- Joint compound touch-ups
- Light feathering around patch edges
- Inside corners
- Repairs near trim
- Small drywall repair kits
A sanding sponge gives beginners more control than loose sandpaper in many small repair situations. It is less awkward to hold and easier to move with light pressure.
What Is Sandpaper?
Sandpaper is a flexible abrasive sheet.
It can be used by hand, folded, cut into smaller pieces, or wrapped around a sanding block. Sandpaper is useful because it is inexpensive, widely available, and easy to match to different grit levels.
For drywall, sandpaper is often most helpful on flat repairs where you want even pressure across the surface.
Sandpaper is useful for:
- Flat drywall patches
- Sanding blocks
- Larger feathered repairs
- Touching up wide areas
- Light paint-edge smoothing
- Custom sanding pieces
- Repairs where a sponge feels too soft
Loose sandpaper can work, but it can also create finger grooves if you press too hard. For better control, use it with a sanding block on flat areas.
When a Sanding Sponge Is Better
A sanding sponge is usually better for small drywall patches and beginner repairs.
It is easy to hold, easy to control, and less likely to dig into one narrow spot if you use light pressure. It also works well around slightly uneven patches where loose sandpaper may wrinkle or fold.
Choose a sanding sponge when:
- The repair is small
- You are sanding spackle
- You are smoothing joint compound edges
- You are working near trim
- You are sanding an inside corner
- You want better hand control
- You are new to drywall repair
- You are doing light final smoothing before primer
Fine-grit sanding sponges are especially helpful for final smoothing. Medium-grit sanding sponges are useful only when the patch has raised ridges or high spots.
For small patch repairs, this guide to the best sanding sponge for drywall patches explains which grit choices are easiest for beginners.
When Sandpaper Is Better
Sandpaper is better when you want a flat sanding surface or need to use a sanding block.
It can also be useful when you want to cut smaller pieces for tight spots or replace the abrasive surface often during a larger repair. Sandpaper sheets give you flexibility, but they take more care to use smoothly.
Choose sandpaper when:
- The repair is broad and flat
- You are using a sanding block
- You want a very flat leveling pass
- You need to cut custom pieces
- You are smoothing a larger feathered patch
- You want to replace worn abrasive quickly
- You are sanding a long flat edge
Avoid pressing loose sandpaper with just your fingertips on soft joint compound. That can leave uneven marks that show after primer and paint.
When a Sanding Block Is Useful
A sanding block is useful when the patch is flat but slightly raised.
The block gives sandpaper a firm backing. That can help level high spots more evenly than loose sandpaper or a soft sponge. This is helpful on larger patches where the surface needs to stay flat.
A sanding block is not always the best choice for tiny repairs or corners because it can feel too stiff.
Use a sanding block for:
- Larger flat drywall patches
- Raised joint compound ridges
- Wide skimmed areas
- Flat repairs away from corners
- Leveling before final sponge sanding
- Areas where you need even pressure
Use light pressure. A sanding block can remove material faster than expected, especially on soft compound.
Why Grit Choice Matters
Grit tells you how coarse or fine the sanding surface is.
Lower grit removes material faster. Higher grit smooths more gently. For drywall patches, you usually want medium, fine, or extra-fine grit. Very coarse sanding can scratch the wall, tear drywall paper, or remove too much patching material.
The goal is to blend the patch into the wall, not grind it down aggressively.
For drywall patches, grit affects:
- How fast material is removed
- How smooth the patch feels
- How easy it is to feather the edge
- How much dust is created
- How likely you are to oversand
- How well primer hides the repair
If you are not sure where to start, choose fine grit first. It is slower, but safer for small repairs.
Medium Grit vs Fine Grit vs Extra-Fine Grit
Most drywall patch sanding can be handled with medium, fine, and extra-fine options.
Medium grit is for shaping. Fine grit is for smoothing. Extra-fine grit is for a final light pass when the repair is already level.
Use medium grit when:
- The patch is too high
- There are putty knife ridges
- Joint compound dried unevenly
- You need to shape the first coat
- You are sanding a larger repair lightly
Use fine grit when:
- The patch is mostly level
- You are finishing spackle
- You are smoothing joint compound
- You are feathering patch edges
- You are preparing for primer
Use extra-fine grit when:
- The patch already feels smooth
- You want a final finishing pass
- The surrounding wall is very smooth
- You are softening tiny sanding marks
- You are preparing a visible repair for primer
Do not try to fix a low spot by sanding more. If the patch is low, add another thin coat of spackle or joint compound instead.
Why Sanding Sponges Are Often Easier for Small Drywall Patches
Small drywall repairs need control more than speed.
A sanding sponge fits naturally in your hand and helps keep pressure spread out. That makes it useful for beginner homeowners who are smoothing small areas and trying not to damage the wall around the patch.
Sanding sponges are beginner-friendly because they:
- Are easy to grip
- Do not fold like loose sandpaper
- Spread pressure better than fingertips
- Work well on small patches
- Can follow slight surface changes
- Are useful near corners and trim
- Are simple to store in a drywall repair kit
For small nail holes and light spackle repairs, a fine-grit sanding sponge is usually the easiest tool to control.
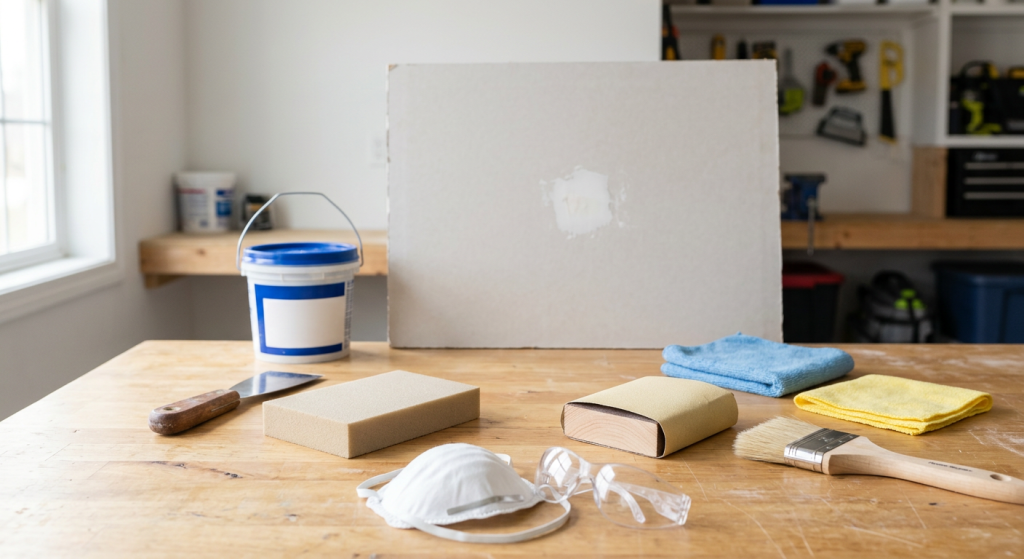
Buying Guidance for Drywall Sanding Supplies
You do not need a complicated sanding setup for basic wall repairs.
A small collection of sanding sponges, a few sandpaper sheets, and one sanding block can handle many homeowner patching projects. Add dust protection and cleaning supplies so the wall is ready for primer afterward.
A practical drywall sanding kit can include:
- Fine-grit sanding sponges
- Medium-grit sanding sponges
- Angled sanding sponge
- Sandpaper sheets
- Sanding block
- Dust mask
- Safety glasses
- Microfiber cloths
- Tack cloths
- Spackle
- Joint compound
- Putty knives
- Primer
- Drywall repair kit
Common sanding brands homeowners may see include 3M, Gator, Norton, Diablo, Hyde, and Warner. Treat these as examples to compare, not final ranked recommendations. Product details can change, so final product choices should be verified before adding affiliate links.
If you are still deciding what patching product to sand, this spackle vs joint compound guide explains which material fits different wall repairs.
How to Sand Drywall Patches Without Oversanding
Oversanding is one of the easiest ways to make a drywall repair worse.
If you sand too hard, you can dig into the compound, expose drywall paper, rough up the surrounding paint, or create a low spot. The best method is light pressure and frequent checking.
Follow this simple sanding process:
- Let the spackle or joint compound dry fully
- Put on a dust mask and safety glasses
- Start with fine grit for small patches
- Use medium grit only for raised ridges
- Sand with light pressure
- Feather the patch edge into the wall
- Stop often and feel the surface with your hand
- Switch to fine or extra-fine grit for the final pass
- Avoid sanding deep into the center of the patch
- Wipe dust away before primer
Your hand can often feel uneven areas better than your eyes can see them. Run your fingers lightly over the patch to check for ridges.
How to Feather the Edges of a Drywall Patch
Feathering means blending the edge of the patch into the surrounding wall.
This matters because a hard patch edge can show through primer and paint. A patch should fade smoothly into the wall instead of ending with a visible ridge.
To feather a drywall patch:
- Sand the outside edge lightly
- Use small circular or sweeping motions
- Keep pressure gentle
- Blend the edge into the painted wall
- Avoid staying in one spot too long
- Check the edge by touch
- Add another thin coat if the edge will not blend
Sometimes the right fix is more compound, not more sanding. If the patch has a dip or sharp edge, apply a thin skim coat, let it dry, and sand again lightly.
How to Reduce Dust While Sanding Drywall
Drywall sanding creates fine dust, even on small repairs.
Dust can spread onto floors, trim, furniture, and nearby walls. It can also interfere with primer and paint if it is left on the patch.
To reduce sanding dust:
- Sand only as much as needed
- Use light pressure
- Avoid aggressive sanding
- Wear a dust mask
- Wear safety glasses
- Use a sanding sponge for small repairs
- Skip power sanding on small patches
- Lay down a drop cloth if needed
- Keep children and pets away from the work area
- Clean the surface before primer
For small drywall patches, hand sanding is usually safer and cleaner than power sanding. A power sander can remove too much material quickly and spread dust through the room.
Cleaning the Wall Before Primer
Primer needs a clean surface.
If dust stays on the wall, primer may not bond evenly. The repair can look gritty, dull, or patchy after painting.
After sanding, clean the patch by:
- Wiping loose dust with a microfiber cloth
- Using a tack cloth lightly if appropriate
- Vacuuming nearby dust if needed
- Checking the wall by touch
- Letting any damp-wiped area dry fully
- Inspecting the patch in good light
- Priming the repair before painting
Do not paint directly over sanding dust. Even a smooth patch can look rough if dust gets trapped under primer or paint.
Why Primer Matters After Sanding
Primer helps seal spackle, joint compound, and exposed drywall areas.
Patching materials can absorb paint differently from the surrounding wall. Without primer, the repair may flash through as a dull or uneven spot after painting.
Use primer after sanding when:
- You repaired a drywall patch
- Spackle or joint compound is exposed
- The patch is larger than a tiny nail hole
- Drywall paper is exposed
- The surface looks porous
- You sanded through old paint
- The wall has uneven sheen
Let primer dry according to the product label. If it feels rough after drying, sand very lightly with fine or extra-fine grit and wipe away dust before painting.
If you are unsure how much primer to use, this guide on how many coats of primer over spackle explains when one coat is enough and when two coats help.
Common Mistakes When Choosing Sanding Supplies
The wrong sanding supply can make a simple patch harder than it needs to be.
Beginners often choose sanding tools that are too aggressive or too awkward for the repair size.
Common buying mistakes include:
- Choosing grit that is too coarse
- Buying only one grit for every repair
- Using loose sandpaper for tiny patches without control
- Skipping fine-grit sanding sponges
- Not buying a sanding block for flat repairs
- Ignoring dust masks and safety glasses
- Using old clogged sanding sponges
- Buying supplies without checking the repair size
A small drywall repair kit is useful, but make sure it includes a sanding option that is gentle enough for final smoothing.
Common Mistakes When Sanding Drywall
Most sanding problems come from using too much pressure or sanding for too long.
Drywall compound is softer than many homeowners expect. It does not take much to remove material.
Common sanding mistakes include:
- Sanding before the compound is dry
- Pressing too hard
- Oversanding the center of the patch
- Sanding into drywall paper
- Leaving a hard edge around the patch
- Using medium grit for final smoothing
- Power sanding small patches
- Skipping dust cleanup
- Painting without primer
- Trying to sand a low spot flat
If the sponge or sandpaper starts clogging, replace it or clean it according to the product type. A clogged sanding surface can drag, smear, or sand unevenly.
Safety Tips for Drywall Sanding
Drywall sanding is common, but it still needs basic safety.
Fine dust can irritate your eyes and lungs. Aggressive sanding can also damage the wall and create more cleanup.
Use these safety habits:
- Wear a dust mask
- Wear safety glasses
- Keep sanding pressure light
- Avoid power sanding small patches
- Do not sand unknown old coatings aggressively
- Keep dust away from children and pets
- Clean the area before priming
- Wash your hands after sanding
- Follow labels for spackle, joint compound, and primer
Be more cautious with older homes, peeling paint of unknown age, moisture damage, mold, or unusual wall coatings. Those situations may need a different repair approach before sanding.
When to Replace Sanding Sponges or Sandpaper
Worn sanding supplies do not work evenly.
A sanding sponge can clog, lose grit, or wear down at the edges. Sandpaper can tear, load up with dust, or stop cutting smoothly. When that happens, you may press harder without realizing it, which increases the chance of oversanding.
Replace sanding supplies when:
- The grit feels smooth
- The sponge is clogged with compound
- The sandpaper is torn
- The sponge edges are crumbling
- It takes too much pressure to sand
- The tool leaves uneven scratches
- Old paint or debris is stuck to the surface
- The repair is important and the abrasive is worn out
For visible drywall repairs, starting with a clean sanding sponge or fresh sandpaper is usually worth it.
Final Thoughts
Sanding sponge vs sandpaper for drywall is not about one tool being better for every repair. A sanding sponge is usually easier for small patches, corners, and beginner touch-ups. Sandpaper is useful for flat areas, especially when paired with a sanding block.
Use medium grit only when you need to knock down raised areas. Use fine grit for most final smoothing. Use extra-fine grit for a light finishing pass on already smooth repairs.
The best drywall patch results come from light pressure, careful feathering, dust cleanup, and primer before paint. Avoid aggressive sanding and do not try to fix every problem by sanding harder. If the patch is low or uneven, another thin coat of spackle or joint compound is often the better fix.