water leaking under kitchen sink: what to check first
If you find water leaking under kitchen sink cabinets, start by drying the area, stopping active water if needed, and tracing the leak before tightening or replacing anything. Water under a sink can come from the faucet supply lines, shutoff valves, drain pipes, P-trap, sink strainer, garbage disposal, dishwasher drain hose, or even spilled water that ran down from the countertop.
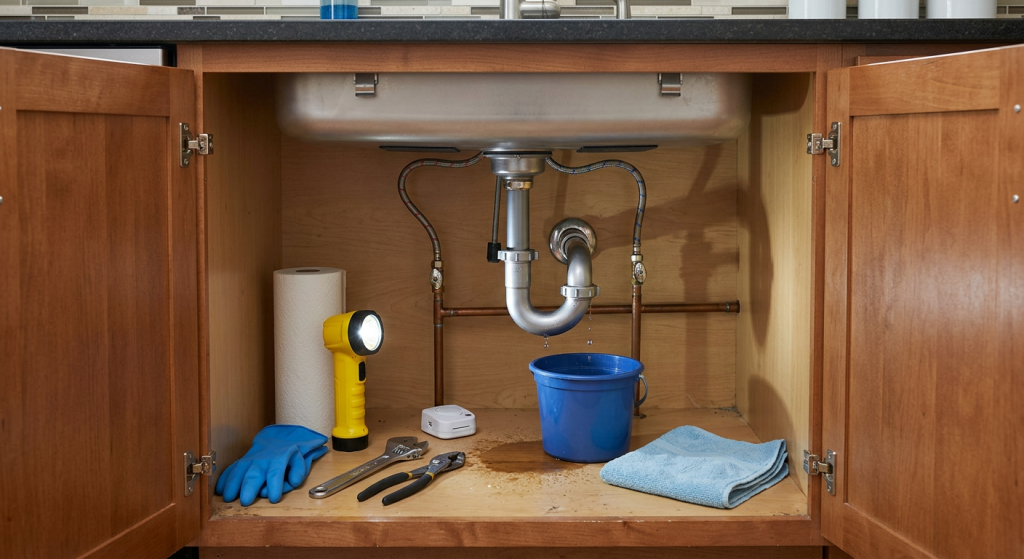
The first goal is not to repair everything at once. It is to figure out whether the leak happens when the faucet runs, when the sink drains, when the dishwasher runs, or even when nothing is being used. Use towels, a flashlight, and a small bucket to make the cabinet safer and easier to inspect.
| What You See | Possible Source | First Check |
|---|---|---|
| Drips when faucet is on | Supply line or faucet connection | Check connections under faucet |
| Drips when sink drains | Drain pipe, P-trap, or strainer | Run water and watch drain parts |
| Water near disposal | Disposal seal or drain connection | Look for drip location, not just puddle |
| Water appears after dishwasher runs | Dishwasher drain hose | Watch during drain cycle |
Water Leaking Under Kitchen Sink: Start by Drying the Area
When water is already spread across the cabinet floor, it is hard to know where it came from. Start by removing everything from under the sink. Put cleaning bottles, trash bags, and stored items somewhere dry.
Use towels to soak up standing water. If water is dripping, place a small bucket or pan under the drip while you inspect. A flashlight will help you see the back wall, shutoff valves, supply lines, drain fittings, and the underside of the sink.
Dry the cabinet floor, pipes, and fittings as much as possible. This step matters because a fresh drip is much easier to trace on a dry surface. If everything is already wet, you may mistake old water for an active leak.
Use this simple tracing method
- Dry the cabinet floor and pipe surfaces
- Place a dry towel or paper towel under the plumbing
- Run the faucet briefly with the drain open
- Fill the sink slightly, then let it drain
- Watch with a flashlight for the first new drip
- Check again after the dishwasher runs
Do not rush to tighten every fitting. A leak may be coming from above and dripping onto a lower pipe. Always look for the highest wet point first.
Also check for false alarms. Water can drip from a wet sponge, a spray bottle, a trash bag, or condensation on cold pipes. Water can also run from the countertop or faucet base into the cabinet, making it look like a plumbing leak below.
After the leak is fixed, water leak detector placement can help you catch future under-sink drips earlier.
Check Supply Lines, Faucet Connections, and Shutoff Valves
If the leak appears when the faucet is running, or if water drips even when the sink is not draining, check the water supply side first. These are the small hot and cold lines that run from the shutoff valves to the faucet.
Look at the shutoff valves on the wall or cabinet floor. Check where each valve connects to the supply line. Then follow the lines upward to the faucet connection. A slow supply leak may look like a shiny bead of water, a damp line, or a small drip that forms every few seconds.
Run the faucet and watch the lines. Then turn the faucet off and keep watching. If a connection drips under pressure, the leak may continue even when the drain is not being used.
A very slight drip at a threaded connection may sometimes stop with gentle tightening. Use an adjustable wrench only if you can clearly see the leaking connection and the fitting is in good condition. Turn slowly and avoid forcing it. Overtightening can crack fittings, damage washers, or make the leak worse.
If the supply line is kinked, rusted, swollen, cracked, or dripping from the hose itself, it may need replacement rather than tightening. Basic replacement supply lines and washers are common parts, but do not replace anything if you are unsure which part is leaking or how it connects.
If water is spraying, running, or spreading quickly, shut off the water at the valves under the sink. If those valves do not stop the leak, use the home’s main water shutoff and call a plumber.
Check the Drain Pipe, P-Trap, and Sink Strainer
If water appears only when the sink drains, the problem is likely on the drain side. This includes the tailpiece under the sink, the P-trap, slip-joint connections, and the sink strainer where the drain basket meets the sink basin.
Run water for a few seconds and watch the drain assembly. If nothing drips, fill the sink with a few inches of water and then release it. A fuller sink sends more water through the drain at once, which can reveal leaks that do not show during a light trickle.
The P-trap is the curved section of pipe under the sink. It often has slip-joint nuts at each end. A small drip from one of these joints may mean the nut is loose, the washer is worn, or the pipe is slightly misaligned.
Slip-joint pliers can help with a loose drain nut, but use light pressure. Plastic drain parts can crack if overtightened. Metal parts can also be damaged if they are old or corroded.
The sink strainer can leak where it seals to the sink basin. This leak may show up as water dripping from the underside of the sink around the drain basket, not from the P-trap itself. If the strainer seal has failed, tightening from below may not solve it for long.
Plumber’s tape is not a cure for every under-sink leak. It is only useful on certain threaded connections where it is appropriate. Many drain leaks are caused by washers, alignment, or failed seals, not threads that need tape.
If the sink is also draining slowly, compare these leak checks with our kitchen sink draining slowly guide.
Look for Garbage Disposal or Dishwasher Drain Clues
A garbage disposal adds more leak points under the sink. Water can appear near the disposal because of the sink flange above it, the discharge pipe on the side, the dishwasher drain connection, or the disposal body itself.
Before inspecting near a disposal, turn it off. Do not touch wiring or electrical parts when water is present. If the cabinet is wet near an outlet, cord, or disposal wiring, stop and call a plumber or qualified professional.
Run water into the disposal side of the sink and watch carefully. A leak at the top may point to the mounting area or sink flange. A leak at the side may come from the discharge pipe connection. Water underneath the disposal body can be more serious and should not be ignored.
The dishwasher can also leave clues. Many dishwashers drain through a hose that connects to the disposal or sink drain. If water appears only after the dishwasher drains, watch the hose connection and the drain path during that part of the cycle.
Check these disposal and dishwasher clues carefully
- Water appears only on the disposal side
- Drips form near the disposal discharge pipe
- Water shows up after the dishwasher drains
- The dishwasher hose looks loose or kinked
- The cabinet smells musty near the disposal
- Water is close to electrical wiring or an outlet
A loose hose clamp or visible drip may be simple to identify, but do not take apart the dishwasher, replace the disposal, or work on electrical connections as a beginner repair.
Common Mistakes to Avoid
Under-sink leaks can be confusing because water travels. The puddle is not always directly below the leak. Work slowly and confirm the source before trying a fix.
Avoid these common leak-check mistakes
- Tightening every fitting without finding the leak
- Overtightening plastic drain nuts
- Ignoring water near disposal wiring or outlets
- Assuming a puddle means the lowest pipe is leaking
- Using plumber’s tape on the wrong type of connection
- Leaving the cabinet wet after the leak slows down
Do not keep running water to “test” a leak that is actively spreading. A short test is useful, but repeated testing can soak the cabinet, damage flooring, or reach electrical components.
After any small fix, dry the area again and test carefully. A leak tray or small water alarm under the sink can help catch future drips early, especially after a repair or in a cabinet that has leaked before.
When to Shut Off Water and Call a Plumber
Shut off the water right away if the leak is active, spreading, spraying, or soaking the cabinet. Use the shutoff valves under the sink first. Turn the hot and cold valves clockwise until they stop. If that does not stop the water, use the main shutoff for the home.
Call a plumber if you cannot identify the source, the shutoff valves do not work, the leak comes from inside a wall, or the cabinet keeps getting wet after basic checks. Also call if the plumbing is corroded, parts are cracked, or the leak is near electrical wiring, a garbage disposal cord, or an outlet.
Replacement washers, supply lines, or drain parts may be needed, but guessing can waste time and cause more leaks. A plumber can confirm whether the problem is a loose connection, failed seal, damaged valve, disposal issue, or a drain assembly that needs proper repair.
If the cabinet floor is swollen, moldy, or soft, stop using the sink until the leak is fixed and the area can dry.
Final Thoughts
Water under a kitchen sink is stressful, but the first steps are simple: dry the cabinet, protect the area, and trace when the leak happens. Check supply lines and shutoff valves if water appears with the faucet on. Check the drain, P-trap, sink strainer, disposal, and dishwasher hose if water appears during draining.
Avoid overtightening parts or working near electrical components when water is present. If the leak is active, spreading, hard to trace, or close to disposal wiring, shut off the water and call a plumber.