
garage door bottom seal: replacement basics
A garage door bottom seal is the flexible gasket attached to the lower edge of the door. Replacing a worn seal can reduce drafts, visible light, dust, leaves, insects, and minor wind-driven water, but the replacement must match the existing retainer and seal profile. Only replace an accessible gasket when the garage door is stable and operating normally. Stop if springs, cables, tracks, rollers, brackets, panels, or opener components are damaged.
| Existing condition | Likely issue | First step |
|---|---|---|
| Torn or missing flexible seal | Worn gasket | Identify the original seal profile |
| Hardened or flattened seal | Age or compression damage | Compare profile and attachment dimensions |
| Light visible beneath part of door | Seal wear or uneven door/floor contact | Inspect gasket, floor, and door position |
| Seal pulled from retainer | Wrong fit, wear, or damaged channel | Inspect the retainer before replacing |
| Bent or corroded retainer | Retainer damage | Do not force a new seal into it |
| Door bottom uneven from side to side | Door, floor, or mechanical issue | Evaluate the garage-door system first |
What a Garage-Door Bottom Seal Does
The bottom seal is a flexible gasket that compresses between the lower edge of the garage door and the floor when the door closes. Proper contact can reduce airflow, visible light, dust, leaves, insects, and small amounts of wind-driven water entering beneath the door.
The gasket is not waterproofing or complete pest protection, and it should not be treated as an airtight seal. It also cannot correct a severely sloped garage floor or a door that closes unevenly because of mechanical or structural problems.
A properly fitted bottom seal should compress enough to close ordinary small irregularities without being crushed excessively. If one side of the door sits significantly higher than the other, replacing the gasket may improve contact but will not correct the underlying problem.
Identify the Existing Seal and Retainer
Before buying a replacement, identify both the flexible seal profile and the retainer or channel that holds it. Garage doors use several bottom-seal arrangements, and parts that look similar in photographs are not necessarily interchangeable.
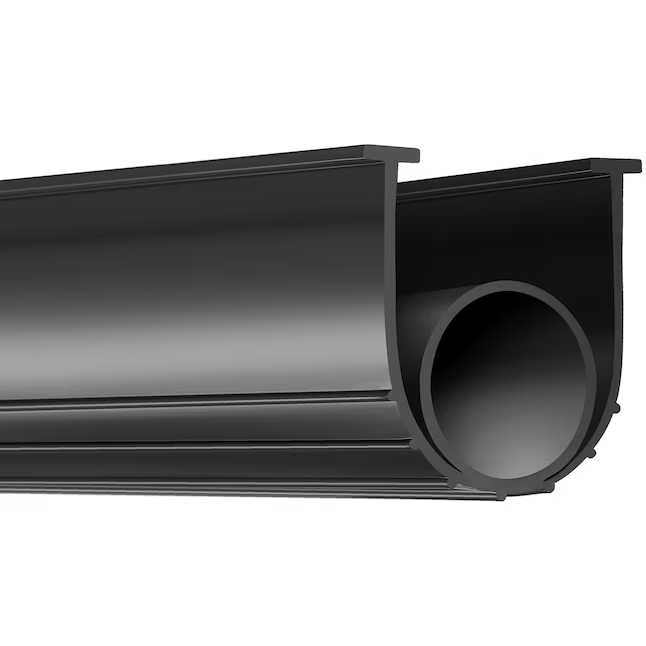
Common generic profiles include T-end, bead-end, bulb, and U-shaped seals. A T-end seal typically has one or more T-shaped attachment edges that slide into matching channels. Bead-style products use rounded attachment edges, while bulb and U-shaped seals form different compression shapes beneath the door.
These names are useful descriptions, but they are not universal sizing standards. Two products sold as T-end seals can have different attachment dimensions and may fit different retainers.
Also determine whether the retainer has a single channel or multiple channels. Measure the attachment ends and, where relevant, the spacing between channels. Overall gasket width, material thickness, bulb shape, and flexibility also affect fit.
An attachment end that is too large may jam in the channel. One that is too small may slide loosely or pull free during operation. Identifying the exact retainer arrangement is therefore more important than choosing a seal solely because its general shape appears correct.
Inspect Before Replacement
Examine the existing garage door weather seal before removing it. Look for torn, cracked, flattened, hardened, or missing material. Check whether sections have pulled out of the track or shifted sideways.
Inspect the retainer as well. Bent areas, loose fasteners, corrosion, damaged channel openings, and sharp edges can prevent a replacement from sliding correctly or staying secure.
Do not run bare fingers along damaged metal. Retainers can develop sharp edges where they are bent, corroded, or damaged.
Look beyond the gasket to the bottom door panel and overall garage-door position. The door should appear stable, close without binding, and make reasonably even contact with the floor. One side sitting noticeably lower than the other may point to a garage-door system problem rather than a seal problem.
Photograph the end of the existing retainer and the seal profile before removal. Include the original orientation, and consider placing a ruler next to the exposed profile in a close-up photograph so you can compare dimensions when shopping.
Measure and Choose a Compatible Replacement
Garage-door width tells you how much seal material is needed, but width alone does not establish compatibility.
Compare the number of retainer channels, the shape of the attachment ends, their dimensions and spacing, the overall gasket width, the shape and size of any bulb, and the orientation of the original material. Flexibility also matters because different profiles compress differently against the floor.
Do not assume that one attachment dimension fits every garage door. Even products with the same general profile name may use different-sized beads or T-ends.
Pay attention to orientation. Some seals have a specific top and bottom or are designed to fold into a particular shape once installed. Installing the material upside down or twisted can cause poor floor contact or make it pull from the retainer.
Do not stretch a replacement gasket while measuring or installing it. Stretching can temporarily make a piece appear longer, only for it to contract after installation and leave the ends exposed.
If you cannot identify the profile confidently, preserve your photographs and measurements and consult the garage-door manufacturer, a garage-door supplier, or a qualified technician rather than guessing.
Basic Replacement Process
These steps apply only to an accessible flexible bottom seal on a stable sectional garage door. They do not include work involving springs, cables, tracks, rollers, brackets, opener force settings, damaged panels, or structural components.
Replacement Steps
- Follow the garage-door opener manufacturer’s instructions for disabling automatic operation as appropriate before beginning work.
- Keep remote controls away from the work area so another person cannot activate the door unexpectedly.
- Put the garage door in a safe, stable position that provides access to the bottom retainer.
- Never work beneath a door that is unsupported, unstable, unusually heavy, or difficult to control.
- Locate an accessible end of the bottom-seal retainer.
- Slide the old flexible gasket out of the channel without prying open, bending, or spreading the retainer.
- Remove ordinary loose dirt and debris from the accessible channel with a soft brush or cloth.
- Avoid sharp tools that could distort the retainer or create damaged metal edges.
- Align the replacement attachment ends with the correct channel or channels.
- Confirm the orientation before feeding a long section into the retainer.
- Feed the new seal gradually through the channel instead of trying to pull the entire length through at once.
- Keep the gasket straight and supported as it moves through the retainer.
- Do not stretch the seal.
- Center the material across the garage door after it is fully installed.
- Allow the gasket to rest naturally before making a final cut.
- Trim excess material only when the product or manufacturer instructions permit it.
- Restore automatic operation according to the garage-door opener manufacturer’s instructions.
- Clear the travel path and test the complete garage door before considering the job finished.
A second person can sometimes help support a long flexible seal as it is fed into the retainer, but no one should stand beneath the garage door. Hands should also remain clear of hinges, rollers, lift cables, and other moving components.
Do not adjust, loosen, remove, or otherwise handle garage-door springs or lift cables as part of bottom-seal replacement.
Common Replacement Problems
Seal Will Not Enter the Retainer
If the replacement will not enter the retainer easily, stop and recheck the profile. The attachment dimension may be wrong, the seal may be oriented incorrectly, or debris may remain in the channel.
A damaged or distorted channel can create the same symptom.
Do not hammer the gasket into place, pry the channel wider, or use excessive pulling force. Forcing the wrong profile can damage both the seal and retainer.
Seal Jams Partway Through
A gasket that starts properly but jams farther along the channel may be encountering dirt, folded material, a damaged section of retainer, a rough retainer joint, or an incompatible profile.
Back the material out as appropriate and inspect instead of pulling harder. More force can stretch the gasket or damage the attachment edges.
Seal Is Too Loose or Pulls Out
If the new gasket slides loosely or pulls from the channel, its attachment ends may be too small for the retainer.
Other possibilities include using the wrong channel, stretching the seal during installation, or choosing an incompatible replacement profile.
Do not try to compensate for an obviously loose fit by deforming the retainer.
Light Remains Beneath One Side
Visible light after replacement does not automatically mean the new garage door bottom gasket is defective. The garage floor may slope, the door may close unevenly, or the bottom panel may be damaged.
Door position and balance can also affect how evenly the gasket contacts the floor.
A flexible seal can accommodate ordinary small variations, but it should not be expected to correct a large difference from one side of the opening to the other.
Seal Folds or Drags
A gasket that folds excessively may be too wide, twisted, incorrectly oriented, or installed where there is insufficient clearance.
Retainer damage can also prevent the seal from hanging correctly.
Do not attempt to reshape a damaged retainer while it is attached to an unstable garage door.
Test the Garage Door
Once the seal is installed, clear people, pets, tools, and stored objects from the garage-door travel path before restoring and testing normal operation.
Open and close the door through a complete cycle while observing its movement. It should travel normally without binding, jerking, or developing unusual side-to-side movement.
When closed, the bottom should reach the floor reasonably evenly. The new gasket should remain centered in the retainer and should not be crushed excessively, folded sharply, or pulled loose.
Confirm that the garage-door opener and manufacturer-provided safety features continue to function normally.
Stop automatic operation if the door begins binding, moves unevenly, reverses unpredictably, or pulls the gasket from the retainer. Do not alter opener safety settings in an attempt to make the door overcome a new problem.
When a New Seal Is Not Enough
A flexible garage door bottom seal cannot repair broken springs, damaged cables, bent tracks, door imbalance, damaged panels, or opener problems. It also cannot correct major floor slope, settlement, structural movement, or a damaged retainer.
Water entering beneath the garage door may have causes beyond the gasket. Grading, drainage, runoff patterns, garage-floor slope, and other building-envelope conditions can direct water toward the opening.
Do not add progressively larger gasket material in an attempt to block water if doing so interferes with drainage or redirects water toward walls or other vulnerable parts of the structure.
Side daylight or airflow is a separate issue from the bottom gasket. If the opening is along the vertical jambs instead, see garage door gap on sides rather than trying to solve the problem with a thicker bottom seal.
A bent, loose, badly corroded, or sharp retainer also needs attention before a new gasket can operate safely.
Common Mistakes
Buying replacement material by garage-door width alone is one of the most common errors. Width determines how much material is required but says nothing about whether the attachment profile fits the retainer.
Choosing the wrong T-end, bead, channel spacing, or attachment dimension can leave the seal jammed or loose. Stretching the gasket during installation creates another problem because the material may later contract.
Do not force an incompatible gasket into a channel or bend the retainer just to make the wrong seal fit.
Another common mistake is confusing the door-attached bottom gasket with a floor-mounted garage door threshold seal. They are different products installed in different locations and should not automatically be substituted for one another.
A new gasket should not be expected to compensate for major floor unevenness or mechanical problems with the garage door. Never work beneath an unstable door, block drainage, or ignore damaged garage-door components simply because the seal itself is accessible.
Always test normal garage-door and opener safety operation after the work is completed.
Safety and When to Call a Professional
Garage doors are heavy moving systems, and bottom-seal replacement should remain limited to the accessible flexible gasket on a stable, normally operating door.
Professional garage-door service is appropriate when:
- A spring is damaged.
- A lift cable is damaged.
- A track is bent or damaged.
- A roller is damaged.
- A bracket is damaged.
- A garage-door panel is damaged.
- The door is unusually heavy or unstable.
- The door appears unbalanced.
- The door is difficult to control.
- The door cannot remain safely positioned.
- The seal retainer is bent, loose, sharp, or badly corroded.
- The bottom panel is damaged.
- Opener operation is unpredictable.
- Water intrusion points to a broader drainage or building problem.
- Structural movement or significant floor settlement is visible.
- The replacement seal profile cannot be identified confidently.
Do not adjust garage-door springs, loosen or remove spring hardware, touch or adjust lift cables, adjust tracks or rollers, alter brackets, change opener force settings, bypass safety sensors, repair damaged panels, or work beneath an unsupported or unstable garage door.
If any of those components are involved, use a qualified garage-door professional.
Final Thoughts
Replacing a garage door bottom seal successfully depends on matching the original profile to the retainer rather than simply buying a gasket for the correct door width.
Photograph and measure the existing profile, preserve its orientation, and choose attachment ends that match the retainer. Feed the replacement through without stretching it, and make sure the retainer itself is straight, secure, and free of dangerous damage.
After installation, test the entire garage-door system. Normal, predictable door and opener operation is more important than eliminating every small gap. Mechanical, structural, spring, cable, track, or major retainer problems belong with a qualified professional.