
dryer venting into the attic: why it causes problems and what to do
A dryer vent into attic space should be corrected. Clothes-dryer exhaust carries warm, moisture-laden air and lint, and releasing that exhaust into an attic can lead to condensation, damp insulation, staining, mold-like growth, and lint buildup. The correct long-term solution is to route the dryer exhaust to an appropriate exterior termination, then evaluate any moisture or lint left behind.
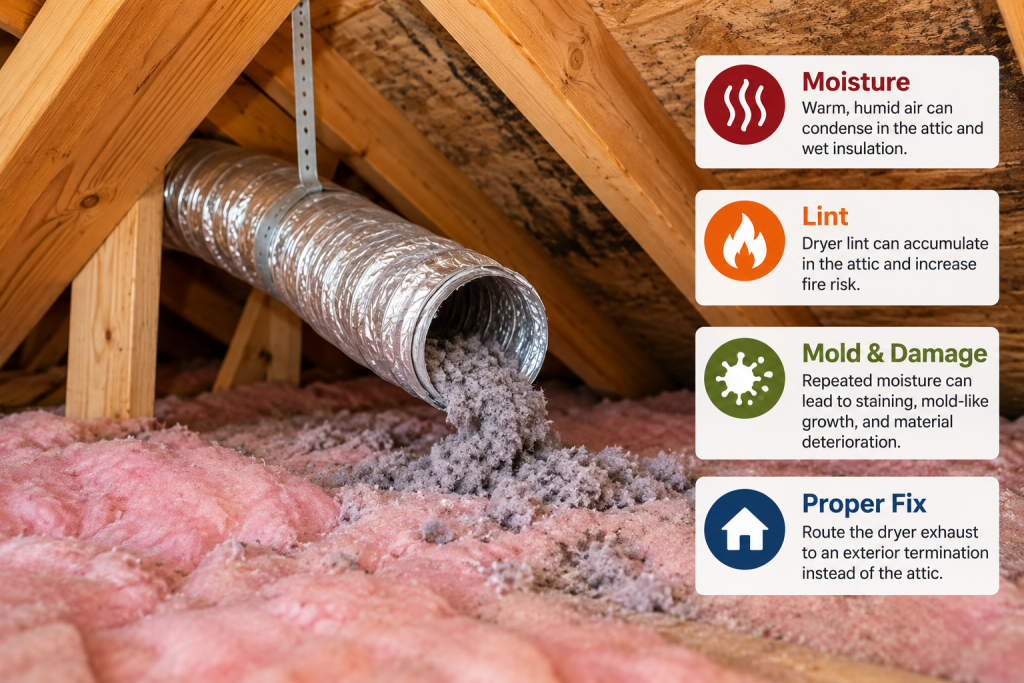
Why a Dryer Vent Into Attic Space Causes Problems
A clothes dryer removes water from wet laundry and sends that moisture out with warm exhaust air. The exhaust also carries lint that escapes the dryer’s internal filter.
If that air is discharged into an attic instead of outdoors, both moisture and lint collect in a space that should remain relatively dry.
Cold weather can make the moisture problem especially noticeable. Warm exhaust may reach roof sheathing, roofing nails, framing, or metal duct surfaces that are cold enough for water vapor to condense. In freezing conditions, moisture can also appear as frost.
The problem is not simply that the attic needs more ventilation. The dryer is introducing a concentrated source of moisture that should not be there in the first place.
Moisture, Condensation, and Wet Insulation
Dryer exhaust can add a large amount of moisture to the attic over repeated drying cycles.
When humid exhaust contacts cold attic materials, moisture may collect on:
- Roof sheathing
- Roofing nails and metal fasteners
- Framing
- Duct surfaces
- Nearby insulation
Repeated wetting can leave stains, darken wood, and contribute to mold-like growth or material deterioration if surfaces remain damp.
Wet insulation can also perform poorly compared with dry insulation. Depending on the material and how wet it becomes, it may compress, mat down, or take time to dry.
Do not assume every damp section must automatically be removed. First correct the dryer exhaust problem, then evaluate whether the insulation and surrounding materials can dry properly or need professional attention.
A winter frost problem near the duct can point to the same moisture source. When the weather warms, that frost may melt and drip onto insulation or ceiling materials.
If cold-weather moisture is freezing on roof sheathing or fasteners, our guide to frost in the attic explains why it forms and what the pattern may indicate.
Why Lint in the Attic Is a Safety Concern
Dryer exhaust carries lint even when the lint screen is cleaned regularly.
If the duct ends in the attic, leaks at a joint, or becomes disconnected, lint can accumulate on insulation, framing, roof sheathing, and surfaces around the termination.
Lint is combustible, and heavy buildup is a fire concern. Lint inside a restricted duct can also reduce airflow, which may make the dryer run longer and operate less efficiently.
A small amount of visible lint does not tell you exactly how restricted the duct is, but extensive deposits near a termination or disconnected section are a strong sign that the exhaust path needs correction.
If lint buildup is substantial, the duct appears severely restricted, or there are obvious signs of overheating or damage, avoid continued dryer use until the condition is evaluated.
Do not disconnect gas dryer lines or open electrical components to investigate the problem.
Signs the Dryer May Be Venting Into the Attic
The most direct sign is a dryer duct that visibly ends inside the attic. Other clues can point toward a disconnected, leaking, or incomplete exhaust path.
Look for:
- A duct that terminates openly in the attic
- A disconnected or separated duct section
- Loose or visibly leaking duct joints
- Lint deposits on insulation, framing, or sheathing
- Damp or compressed insulation near the duct
- Moisture staining near the termination
- Condensation or frost close to the duct in cold weather
- A musty odor
- Warm, humid air around the duct while the dryer operates
- Unusually long drying times
- No exterior dryer termination that can be located from ground level
Long drying time is not proof that the duct vents into the attic. Clogged ductwork, dryer problems, heavy loads, and other airflow restrictions can cause the same symptom.
What Homeowners Can Safely Inspect
A limited visual inspection can answer the most important question: does the duct appear to carry dryer exhaust continuously to the exterior?
From stable attic flooring or a safe platform, visually follow as much of the duct as you can without entering unsafe areas.
Check whether:
- The duct appears continuous
- It clearly ends inside the attic
- A joint has separated
- Lint is collecting around a connection
- Insulation is wet beneath the duct
- Nearby sheathing shows moisture staining
- The duct appears crushed, damaged, or poorly supported
From outside, you may also be able to identify the dryer termination from ground level. The termination should discharge outdoors rather than into another enclosed space.
Do not walk on unsupported ceiling drywall, climb a steep roof, or crawl through an area with unsafe footing. Avoid exposed or questionable wiring, and do not disturb vermiculite or suspected asbestos-containing insulation.
If the duct cannot be followed safely, stop the inspection and have a professional evaluate it.
What to Do If the Dryer Duct Ends in the Attic
An attic termination should not be treated as an acceptable permanent setup.
The dryer exhaust needs to be routed to a proper exterior termination using materials suitable for dryer exhaust. The route should be as direct and practical as the home allows while following the dryer manufacturer’s guidance and applicable local requirements.
The exterior termination should discharge outdoors, remain unobstructed, and use an appropriate hood or damper where required. It should not dump the exhaust into another enclosed space.
Rigid or other approved metal dryer duct is generally preferred over improvised materials. Plastic duct, vinyl duct, makeshift flexible hose, or materials not approved for dryer exhaust should not be used as substitutes.
Do not cut a roof or exterior wall, modify flashing, or alter structural framing to create a new route without the proper skills and equipment. Where a new penetration is required, professional installation is usually the safer choice.
What If the Duct Is Disconnected or Leaking?
A duct that was intended to reach the exterior can still create attic problems if a joint separates or a section is damaged.
The permanent correction is to restore a continuous, appropriate exhaust path so dryer air remains inside the duct until it reaches outdoors. Damaged or unsuitable duct sections may need replacement, and accumulated lint may need to be removed from the affected area and duct system.
After the exhaust path is corrected, evaluate any wet insulation, damp sheathing, or staining. Widespread dampness or extensive mold-like growth should be assessed professionally rather than treated as a simple cleanup job.
Do not seal off the duct opening inside the attic unless the dryer has already been properly rerouted. Blocking the exhaust without providing a working exterior path is not a fix.
Why More Attic Ventilation Will Not Solve the Problem
Adding soffit vents, ridge vents, or an attic fan does not address a dryer that is continuously dumping moisture and lint into the attic.
Attic ventilation may influence how quickly some moisture leaves the space, but it should not be used to compensate for an improper dryer exhaust termination.
The same is true of insulation. Adding more insulation does not stop the dryer from introducing humid air and lint.
Source control comes first: the dryer exhaust should leave the building through an appropriate exterior termination.
For a broader explanation of how attic intake and exhaust are supposed to work, see our attic ventilation guide.
When Professional Correction Makes Sense
Professional help is appropriate whenever the correct exhaust route is unclear, or the work extends beyond simple, safely accessible duct connections.
Consider a qualified dryer-vent specialist, HVAC contractor, general contractor, roofer, electrician, or other appropriate professional when:
- The duct terminates in the attic and needs a new exterior route.
- A new roof or wall penetration is required.
- Roof flashing is involved.
- Attic access is unsafe.
- The duct passes through difficult framing.
- Gas dryer connections would need to be disturbed.
- Electrical work is required.
- Lint buildup is extensive.
- Wet insulation or sheathing is widespread.
- Mold-like growth covers a significant area.
- The proper termination route is uncertain.
The exact trade depends on what must be changed. A roof termination may require roofing expertise, while hardwired electrical work or gas connections require different qualifications.
Frequently Asked Questions
Can a dryer vent into the attic?
No. Dryer exhaust should be routed to an appropriate exterior termination rather than discharged into attic space. The exhaust contains both moisture and lint.
Why is my dryer vent causing condensation in the attic?
Warm, humid dryer exhaust can contact cold roof sheathing, fasteners, framing, or duct surfaces and condense. Cold-weather conditions can make the problem more visible.
Is dryer lint in the attic dangerous?
Lint is combustible, and significant accumulation is a fire concern. It can also indicate a leaking, disconnected, or improperly terminated duct.
Will more attic ventilation fix a dryer vent problem?
No. More attic ventilation does not remove the source of moisture and lint. The dryer exhaust needs to be routed outdoors.
Can I vent a dryer through the roof?
A roof termination can be used where the home, dryer manufacturer guidance, and applicable requirements support that configuration. Roof penetrations and flashing should be handled by a qualified professional when the work is not safely within the homeowner’s skill level.
What should I do if the dryer duct is disconnected in the attic?
Stop treating the disconnected section as acceptable and arrange for the exhaust path to be restored so it remains continuous to the exterior. If lint buildup is substantial or access is unsafe, have the system evaluated before continued use.
Does wet attic insulation need to be replaced?
Not always. Correct the moisture source first, then evaluate how wet the insulation became, whether it can dry properly, and whether it has been damaged or contaminated. Widespread wetting deserves professional evaluation.
Final Thoughts
A dryer vent into attic space should be corrected because the exhaust carries both moisture and lint into an area that should remain dry. The long-term solution is to route the exhaust to an appropriate exterior termination rather than trying to compensate with more attic ventilation.
After the exhaust problem is fixed, evaluate any damp insulation, staining, lint buildup, or mold-like growth left behind. If the route requires roof work, electrical work, gas-line disturbance, or unsafe attic access, use the appropriate qualified professional.