Best Spackle for Nail Holes Before Painting
Best spackle for nail holes is usually lightweight spackle for small interior wall holes because it is easy to apply, dries fairly quickly, sands easily, and works well before primer and paint.
For most beginner homeowners, lightweight spackle is the simplest choice for nail holes from picture hangers, small screws, and minor wall dings. Vinyl spackle or a stronger patching compound may be better when the hole is slightly larger, deeper, or in an area that needs a more durable repair.
The key is to use a small amount, let it dry fully according to the label, sand it smooth, wipe away dust, prime the spot, and then paint.
Best Spackle for Nail Holes: Quick Comparison
| Spackle Type | Best For | Beginner Fit | Main Caution |
|---|---|---|---|
| Lightweight spackle | Small nail holes and tiny dents | Easiest choice | Not for large damage |
| Vinyl spackle | Slightly larger or deeper small repairs | Good with careful sanding | May need longer drying |
| Quick-dry spackle | Fast small touch-ups | Convenient | Do not paint before fully dry |
| Color-changing spackle | Beginner timing help | Very helpful | Still follow the label |
If you are only patching small nail holes before painting, lightweight spackle and a small putty knife are usually enough. If the hole is bigger than a simple nail hole, step back and decide whether you need a stronger patching product or a small drywall repair kit.
Why Lightweight Spackle Is Usually the Easiest Choice
Lightweight spackle is popular for small wall repairs because it is easy to spread and easy to sand.
It is made for minor cosmetic repairs, not structural damage. That makes it a good match for nail holes, small picture-hanger holes, and shallow dents in painted drywall.
Lightweight spackle is a good fit for:
- Small nail holes
- Tiny screw holes
- Picture hanger holes
- Small dents
- Minor wall dings
- Touch-ups before repainting
- Beginner drywall repairs
Lightweight spackle is forgiving because you can apply it with a small putty knife, let it dry, sand it smooth, and prime the spot before painting.
Do not pack on a heavy mound. A thin, smooth fill is easier to sand and less likely to show through the final paint.
When Vinyl Spackle May Be Better
Vinyl spackle is often used for small repairs that need a little more strength than basic lightweight spackle.
It can be a better choice when the hole is slightly deeper, the edges are a little rough, or the repair needs more durability than a very light filler can provide.
Vinyl spackle may be useful for:
- Slightly larger nail or screw holes
- Small gouges
- Deeper dents
- Minor drywall surface damage
- Repairs that need a firmer patch
- Areas that may need more than one thin coat
Vinyl spackle may take longer to dry depending on the product, repair depth, temperature, and humidity. Always follow the label before sanding, priming, or painting.
When Quick-Dry Spackle Helps
Quick-dry spackle is useful when you are handling small repairs and want to move through the project faster.
It can be convenient before repainting a room, touching up a wall, or filling nail holes after removing pictures. Some quick-dry products are made for small repairs that can be sanded and painted sooner than standard products.
Quick-dry spackle can help when:
- The repair is small
- You are filling several nail holes
- You need a faster painting timeline
- The wall damage is shallow
- You can apply a thin layer
- The product label allows faster sanding or painting
Quick-dry does not mean instant. Do not paint over spackle that is wet, soft, cool to the touch, or gummy. Follow the product label and give it more time if the patch is thick or the room is humid.
When Color-Changing Spackle Helps Beginners
Color-changing spackle can be helpful because it gives a visual clue as it dries.
Many beginner homeowners are not sure when spackle is ready to sand or paint. A color-changing product can make that timing easier by changing appearance as it dries.
This can reduce the chance of sanding too soon or painting over damp spackle.
Color-changing spackle is useful when:
- You are new to wall repairs
- You want a drying-time cue
- You are patching several nail holes
- The holes are small and shallow
- You want a simple repair product
- You still plan to prime before painting
Even with color-changing spackle, the label matters. Drying time can still be affected by how much product you apply, how deep the hole is, and the room conditions.
What to Look for When Buying Spackle for Nail Holes
The best product for a nail hole repair should match the size of the hole and the finish you want after painting.
You do not need a large tub of heavy patching compound for a few picture holes. A small container of lightweight spackle or a small drywall repair kit may be more practical.
When buying spackle for nail holes, look for:
- Interior use
- Lightweight spackle for small holes
- Easy sanding
- Paintable finish
- Reasonable drying time
- Low shrinkage wording when available
- A container size that matches the project
- Clear label instructions
- Compatibility with primer and paint
Common spackle brands homeowners may see include DAP, 3M, Red Devil, DryDex, Gorilla, and Crawford’s. Treat these as examples to compare, not final ranked recommendations. Product formulas and labels can change, so final affiliate product choices should be verified before adding links.
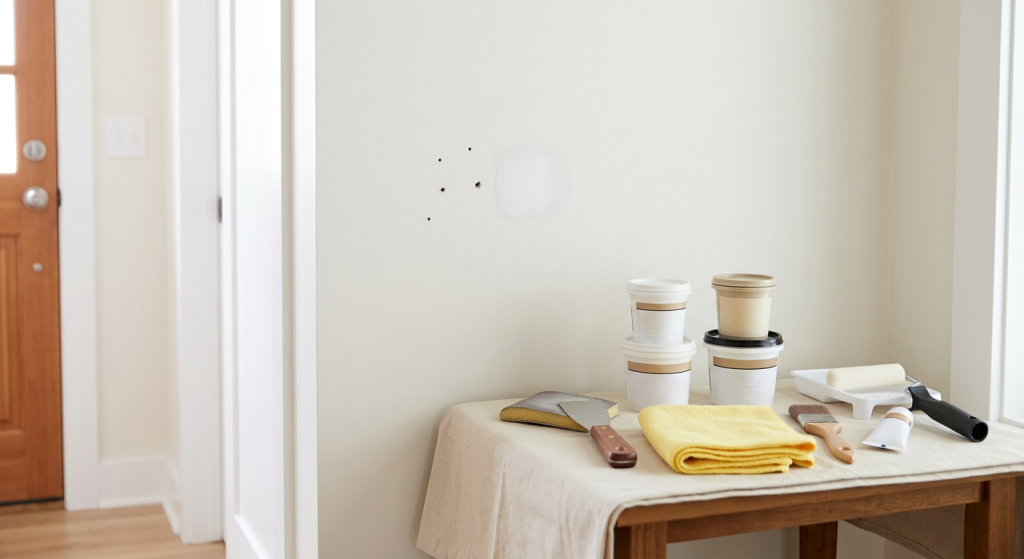
Useful Tools for Patching Nail Holes
Spackle works better when you use the right small tools.
A finger can fill a tiny hole in a pinch, but a putty knife usually gives a cleaner, flatter repair. A small repair kit may include spackle, a putty knife, sanding material, or patching supplies for minor wall damage.
Helpful supplies include:
- Lightweight spackle
- Vinyl spackle
- Quick-dry spackle
- Color-changing spackle
- Small putty knife
- Fine-grit sanding sponge
- Microfiber cloth
- Primer
- Touch-up brush
- Mini roller
- Small drywall repair kit
A touch-up brush is useful for tiny spots. A mini roller can help blend primer or paint over slightly larger patched areas so the repair does not stand out as a shiny brush mark.
How to Apply Spackle to Nail Holes Without Overfilling
The goal is to fill the hole, not build a large bump on the wall.
Too much spackle creates extra sanding and can make the repair more visible after paint. Use just enough to fill the opening and leave the surface slightly smooth.
Follow this simple application process:
- Remove the nail, hook, or screw carefully
- Brush away loose drywall dust
- Scoop a small amount of spackle onto a putty knife
- Press the spackle into the nail hole
- Scrape the knife lightly across the surface
- Remove extra spackle around the hole
- Leave the patch as flat as possible
- Let it dry according to the product label
For deeper holes, one thick fill is not always best. A second thin coat after the first one dries can be cleaner than one heavy mound.
How Long Should Spackle Dry Before Sanding or Painting?
Spackle should dry fully before sanding, priming, or painting.
Dry time depends on the product, the amount used, the depth of the hole, humidity, temperature, and airflow. Some small lightweight repairs dry quickly. Deeper repairs or thicker applications take longer.
The safest rule is to follow the product label.
Spackle may need more drying time when:
- The hole is deep
- Too much spackle was applied
- The room is humid
- The room is cool
- Airflow is poor
- The product is not a fast-dry formula
- The patch still feels soft
Do not paint over wet spackle. Wet or soft spackle can smear, shrink, crack, or show through the paint.
How to Sand Spackle Smooth
Sanding makes the patch blend into the wall.
For nail holes, use a fine-grit sanding sponge and light pressure. You are only smoothing the surface, not grinding down the wall.
To sand a spackled nail hole:
- Make sure the spackle is fully dry
- Use a fine-grit sanding sponge
- Sand with light pressure
- Keep the sanding area small
- Feather the edge into the surrounding wall
- Stop as soon as the patch feels smooth
- Avoid sanding into the drywall paper
- Wipe away dust before primer
Run your hand over the patch. If you feel a bump, sand lightly. If you feel a dip, add another thin coat of spackle instead of sanding more.
Why You Should Prime Spackle Before Painting
Primer helps seal the repair so paint covers evenly.
Spackle can absorb paint differently than the surrounding wall. If you paint directly over it, the patched spot may flash through as a dull, shiny, or uneven mark.
This is especially noticeable on walls with eggshell, satin, or higher-sheen paint.
Prime patched nail holes when:
- The spackle is exposed
- The patch is larger than a tiny pinhole
- The wall paint has sheen
- You sanded the repair
- You want the touch-up to blend better
- The paint label recommends primer
Use a small touch-up brush for tiny repairs or a mini roller for larger groups of nail holes. Let the primer dry according to the label before painting.
How to Paint Over Patched Nail Holes
Painting over spackle is the final step, but it still needs care.
A repair can look smooth before paint and still show afterward if the paint is applied too heavily, skipped over primer, or brushed in a way that leaves a different texture from the rest of the wall.
To paint over patched nail holes:
- Confirm the spackle is dry and smooth
- Wipe away all sanding dust
- Prime the patched area
- Let the primer dry fully
- Use matching wall paint
- Apply light coats
- Feather the paint outward slightly
- Use a mini roller if the wall has roller texture
- Let the paint dry before judging the match
Touch-up paint can look different if the wall paint has faded or aged. A small repair may still be visible in certain lighting, especially on darker colors or higher-sheen finishes.
When a Mini Roller Is Better Than a Touch-Up Brush
A touch-up brush works well for very small nail holes, but it can leave brush texture.
A mini roller can help when you are repairing several holes in one area or when the existing wall was originally rolled. Matching the texture can matter as much as matching the paint color.
Use a mini roller when:
- There are several nail holes close together
- The wall has visible roller texture
- The patch area is larger than a tiny spot
- Brush marks would stand out
- You are repainting a section of wall
- You want to blend primer or paint outward
Use light coats. Heavy paint buildup can make a small nail hole repair more noticeable.
When Spackle Is Not Enough
Spackle is not the right fix for every hole.
A nail hole is small. A damaged drywall area, torn paper, anchor hole, or larger opening may need more repair than basic spackle can handle.
Use more than basic spackle when:
- The hole is larger than a small nail or screw hole
- A drywall anchor tore out
- The drywall paper is ripped
- The wall has a dent with broken gypsum
- The patch keeps cracking
- The hole is deep and wide
- The area needs mesh, a patch, or joint compound
- The repair feels soft or unstable
A small drywall repair kit may be better for anchor holes, small wall damage, or holes that need reinforcement. For larger repairs, joint compound, drywall tape, or a patch may be needed.
If the damage is larger than a simple nail hole, this drywall patch kit vs spackle guide can help you decide when the repair needs support.
Spackle vs Joint Compound for Nail Holes
Spackle and joint compound are not always used the same way.
Spackle is usually the easier choice for small nail holes and quick cosmetic repairs. Joint compound is often better for larger drywall repairs, seams, patches, and areas that need feathering over a wider space.
Choose spackle for:
- Nail holes
- Small screw holes
- Tiny dents
- Picture hanger holes
- Quick wall touch-ups
Choose joint compound for:
- Larger patches
- Drywall tape repairs
- Wider feathered repairs
- Damaged seams
- Multi-coat repairs
For simple nail holes before painting, spackle is usually more convenient than mixing or applying joint compound.
For a broader comparison, read this guide on spackle vs joint compound before choosing a patching product for larger wall repairs.
Common Mistakes When Choosing Spackle
Choosing the wrong product can make a small repair harder.
Most nail holes do not need heavy-duty filler. They need a smooth, paintable patch that is easy to sand.
Common buying mistakes include:
- Buying a product that is too heavy for tiny holes
- Choosing exterior filler for an interior wall repair
- Ignoring drying time on the label
- Assuming quick-dry means ready instantly
- Buying too large a container for a small project
- Skipping color-changing spackle when timing help would be useful
- Not buying a sanding sponge
- Forgetting primer before paint
A small container of lightweight spackle, a putty knife, fine sanding sponge, and primer will handle many basic nail hole repairs.
Common Mistakes When Using Spackle
Most spackle problems come from overfilling, rushing, or skipping prep.
A good nail hole repair should be small, flat, dry, sanded, primed, and painted.
Common application mistakes include:
- Applying too much spackle
- Leaving a raised mound
- Painting over wet spackle
- Sanding before the spackle is dry
- Sanding too aggressively
- Skipping primer
- Painting over sanding dust
- Using a dirty putty knife
- Trying to fill a large damaged area with basic spackle
- Judging the paint match before it dries
If the patch looks bulky before sanding, remove the excess while it is still workable. It is easier to flatten fresh spackle than to sand down a large dried lump.
Beginner Buying Checklist
A simple kit is usually enough for nail holes before painting.
You do not need a complicated repair setup unless the wall damage is larger than basic nail holes.
A practical nail hole repair setup includes:
- Lightweight spackle
- Vinyl spackle for slightly deeper repairs
- Color-changing spackle if you want drying guidance
- Small putty knife
- Fine-grit sanding sponge
- Microfiber cloth
- Primer
- Touch-up brush
- Mini roller
- Matching wall paint
For several small repairs, a small drywall repair kit can be convenient. Just make sure it includes a product suitable for nail holes and a sanding option that is fine enough for final smoothing.
Final Thoughts
The best spackle for nail holes is usually lightweight spackle because it is easy to apply, easy to sand, and practical for small interior wall repairs before painting.
Use vinyl spackle or a stronger patching compound when the repair is slightly larger or deeper. Use color-changing spackle if you want help knowing when the patch is drying, but still follow the product label before sanding or painting.
For a clean repair, apply a small amount with a putty knife, avoid heavy buildup, let it dry fully, sand lightly, wipe away dust, prime the spot, and paint with a touch-up brush or mini roller. Small nail holes are easy to fix when each step is done patiently and lightly.