
drawer slide replacement: how to choose and install matching slides
Drawer slide replacement is usually manageable when you first identify the existing slide type, measure the hardware and drawer correctly, and choose a replacement that matches the mounting style and available clearance. Do not order by length or appearance alone. Side-mount, undermount, roller, ball-bearing, and center-mount slides can require different clearances, brackets, drawer construction, and attachment points.
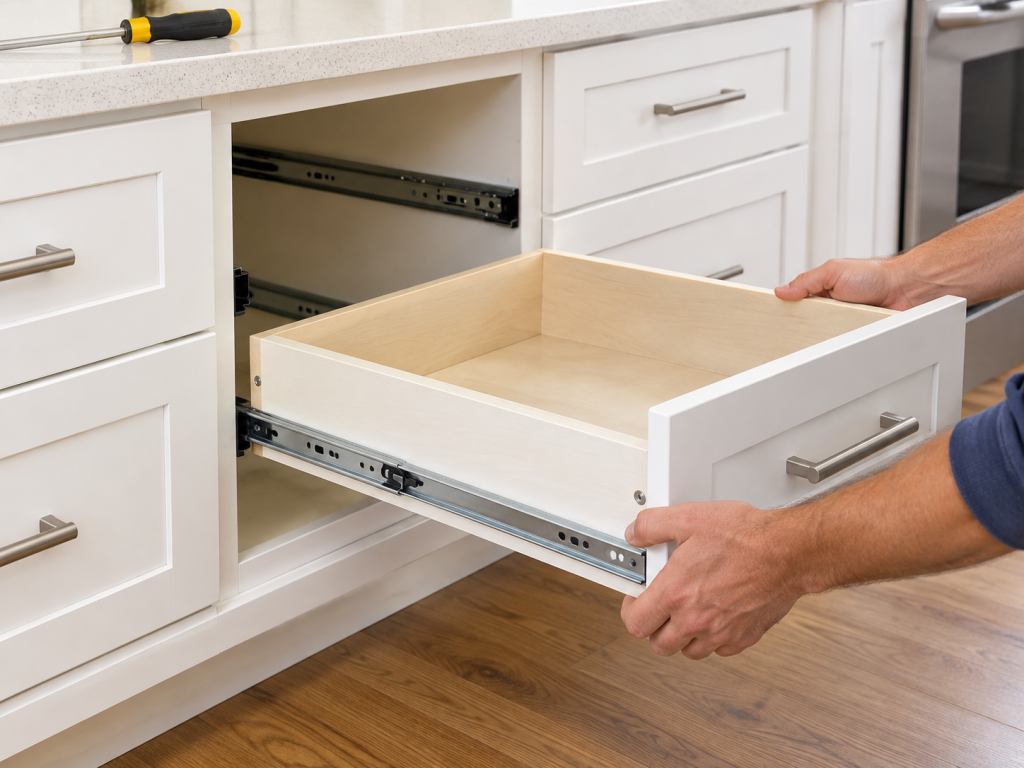
| Check before buying | Why it matters |
|---|---|
| Slide type | Determines mounting and drawer compatibility |
| Existing slide length | Helps identify the appropriate replacement size |
| Cabinet and drawer dimensions | Confirms the new hardware can physically fit |
| Mounting style and clearance | Prevents binding or an unusable drawer |
| Extension type | Determines how far the drawer opens |
| Load requirements | Must suit the drawer, contents, and installation |
| Clips, brackets, or locking devices | May be specific to a runner family |
Make Sure the Slides Actually Need Replacement
A sticking or crooked drawer does not automatically need new hardware. Before removing usable slides, check whether the problem is simply debris, a loose screw, minor misalignment, or a drawer that is not fully engaged with its runners.
Replacement makes more sense when you find physical damage such as:
- a bent rail
- a broken or badly worn roller
- a damaged bearing carriage
- missing bearings
- broken mounting brackets
- cracked retaining or locking components
- hardware that will not remain aligned
- severe wear that prevents smooth travel
- mounting hardware that cannot be secured normally
A failed soft-close component may also lead to replacement when the damping mechanism is integrated into the runner. Diagnose the soft-close problem first rather than replacing the entire system automatically.
If cleaning, tightening, or minor adjustment restores normal movement, keep the existing slides.
If the existing hardware may still be usable, see our guide to how to fix drawer slides before replacing parts that may only need cleaning, tightening, or minor adjustment.
Identify the Slide Type Before Measuring
Remove the drawer only after identifying how its slides disconnect. Depending on the design, removal may involve release levers, lifting and pulling, tilting the drawer, or releasing front locking devices, catches, or clips.
Support a heavy drawer as it comes free. If the disconnect method is unfamiliar, do not pull harder. Look for manufacturer markings and check the instructions for that system.
Once the drawer is out, identify the basic slide style.
Side-mount roller slides typically use a relatively simple track and roller arrangement attached to the drawer and cabinet sides.
Side-mount ball-bearing slides use telescoping metal members with bearing carriages. Designs vary in extension, disconnect method, load rating, and closing features.
Undermount slides are concealed beneath the drawer. They commonly rely on specific locking devices, clips, hooks, drawer-bottom details, and other dimensions established by the runner manufacturer.
Center-mount slides run beneath the center of the drawer and may use rear supports or guides. When replacing one, matching the existing arrangement is generally simpler than converting the drawer to an unrelated system.
Changing from one slide type to another can require different clearances or drawer modifications. That moves the project beyond a straightforward like-for-like replacement.
Drawer Slide Replacement: What to Measure Before Buying
Measure the existing hardware before shopping, and record any manufacturer name, series number, or part markings you can find. Taking clear photos of the slides, brackets, clips, and mounting points can also make matching easier.
Existing slide length
Measure the slide itself rather than assuming the drawer-box length is the slide length.
A replacement will often use the same nominal length as the existing hardware, but confirm that length against the manufacturer’s specifications for the drawer and cabinet. A longer slide is not automatically an upgrade.
The runner has to fit the available cabinet depth, support the drawer correctly, and allow the drawer to close fully.
Drawer-box and cabinet dimensions
Record the drawer-box depth and available cabinet depth. Also note where the existing slide sits in relation to the drawer and cabinet opening.
For side-mounted hardware, measure the available space between the drawer and cabinet. Side-mount slides depend on the clearance required by that specific model.
Do not rely on a universal side-clearance rule.
Undermount requirements
Undermount slides require additional attention because the drawer itself is often built around the runner system.
Depending on the model, compatibility can involve drawer-side thickness, drawer-bottom position, rear preparation, locking devices, hooks, catches, and manufacturer-specific dimensions.
Two concealed runners of similar length are not necessarily interchangeable.
If replacing an undermount system, identifying the existing manufacturer and runner family is especially valuable. A different runner may require alterations to the drawer box that are outside a simple replacement job.
Mounting points and brackets
Note how the existing hardware attaches to both the drawer and cabinet.
Face-frame cabinets may use rear brackets or other mounting arrangements that differ from frameless cabinets. Record those parts before removing them.
Existing screw holes may be reusable when the replacement system allows it, but old holes should not determine the location if they conflict with the new manufacturer’s installation instructions.
Choose Slides That Match the Drawer and Cabinet
Length is only one part of the buying decision.
Before ordering replacement hardware, confirm:
- slide type
- nominal slide length
- side-mount, undermount, or center-mount configuration
- cabinet and drawer construction
- required clearance
- full or partial extension
- standard or soft-close operation
- expected drawer load
- mounting brackets, clips, or locking devices
- drawer thickness or preparation requirements where specified
- whether existing mounting locations can be reused
Ball-bearing versus roller slides
Ball-bearing slides commonly use telescoping rails and may be available with full extension, soft close, or other features. Their load ratings, disconnects, clearances, and mounting requirements are model-specific.
Roller slides use a simpler track-and-roller arrangement and are common on many basic or older cabinets. Replacement hardware still needs to match the track geometry, cabinet arrangement, and drawer position.
Neither design is automatically the right upgrade for every cabinet. A like-for-like replacement is often the least complicated approach when the existing system performed adequately before it wore out.
Full extension versus partial extension
Full-extension hardware allows greater access toward the back of the drawer. Partial-extension designs keep more of the drawer inside the cabinet when fully opened.
If changing extension type, make sure the replacement remains compatible with the drawer, cabinet depth, surrounding clearances, and intended load.
Do not assume that two slides of the same physical length will provide the same travel.
Load capacity
Choose load capacity from the slide manufacturer’s specifications for the actual model and installation.
The required capacity depends on the drawer itself plus what you plan to store in it. Drawer width, mounting orientation, installation method, and slide design can also affect performance.
Do not select a rating from a generic rule or assume a slide keeps the same capacity when installed in a different orientation.
Replacing soft-close slides
If the existing drawer uses integrated soft-close runners, match the complete system rather than assuming an ordinary slide plus a separate damper will duplicate its operation.
Concealed soft-close systems may depend on compatible runners, locking devices, brackets, and drawer preparation. Keep the replacement within the identified hardware family unless the manufacturer documents another compatible option.
If the drawer moves normally but the soft-close feature itself has stopped working, see our guide to a soft-close drawer not working before replacing the complete slide system.
Tools and Preparation
For a straightforward replacement, useful tools include:
- manual screwdriver
- drill/driver used cautiously
- tape measure
- pencil
- small level
- square or straightedge
- flashlight
- manufacturer template or jig if the hardware requires one
Before installation, inspect the drawer and cabinet mounting areas. A new slide needs solid material to hold its fasteners securely.
If particleboard, MDF, plywood, or wood around the mounting points is badly damaged, stop before installing the new hardware. Repeatedly using larger screws in weakened material is not a substitute for a sound mounting surface.
How to Install Matching Replacement Drawer Slides
Step 1: Confirm the replacement hardware
Compare the new hardware with the old system before drilling anything.
Verify slide type, length, mounting configuration, extension, left and right components, and any required clips, brackets, or locking devices. Check the manufacturer’s instructions for the specific model.
Step 2: Mark or preserve the mounting position
If the new slides are direct replacements and the manufacturer allows the existing locations to be reused, the old mounting position can provide a useful reference.
Otherwise, mark the locations specified for the new hardware. Do not force a new runner into unsuitable old holes simply to avoid making the correct layout.
Step 3: Install the cabinet-side hardware
Attach the cabinet-side runners or brackets according to the manufacturer’s layout.
Keep the left and right sides correctly positioned, level where required, and parallel to each other. A runner that angles inward, outward, upward, or downward can cause binding even when the drawer itself is square.
Start fasteners carefully and avoid overtightening them.
Step 4: Install the drawer-side hardware or locking devices
Attach the corresponding drawer members, locking devices, catches, or clips in their specified positions.
Keep track of left- and right-hand parts. Undermount systems in particular may use dedicated locking devices and rear engagement features that must work together.
Do not invent hole locations when the manufacturer provides a drilling layout.
Step 5: Reinstall the drawer
Support the drawer and engage it with both runners according to the slide design.
Some side-mount slides reconnect by aligning telescoping members. Concealed runners may require the drawer to seat onto the slides until its locking devices engage.
Do not force the drawer if one side will not connect. Remove it and identify what is interfering.
Step 6: Test movement and alignment
Open and close the empty drawer several times.
Check that:
- movement is smooth
- both sides travel together
- the drawer closes fully
- the drawer does not lift or shift sideways
- gaps around the drawer front remain reasonably even
- both sides remain securely engaged
If one side behaves differently, recheck mounting position, parallelism, hardware orientation, and engagement before adding weight.
Step 7: Make only permitted final adjustments
Some runner systems provide height, side-to-side, depth, or tilt adjustment. Others offer little or no adjustment.
Use only the adjustments provided for your model and follow its instructions. Avoid compensating for a badly mounted runner by pushing every adjustment to its limit.
Once the drawer operates correctly while empty, reload it and test again.
What If the New Slides Do Not Match the Old Holes?
Different slide families can use different mounting patterns even when their overall lengths are similar.
If the manufacturer’s required holes differ, use the specified mounting positions rather than intentionally misaligning the hardware to catch an old hole.
Closely spaced old and new holes can also weaken some cabinet materials. If the mounting area is deteriorated, crumbling, split, or no longer capable of holding the fasteners securely, stop before proceeding.
That is a cabinet or drawer repair issue, not simply a slide-installation adjustment.
Common Replacement Mistakes
Common problems include:
- ordering slides before identifying the existing type
- assuming same-length slides are interchangeable
- ignoring side or undermount clearance
- buying by appearance alone
- forcing an unfamiliar drawer disconnect
- mixing incompatible runners, clips, or brackets
- installing left and right components incorrectly
- mounting the two sides out of parallel
- overtightening fasteners
- installing new hardware onto a damaged mounting surface
- guessing at load capacity or drawer machining dimensions
Careful identification and measurement prevent more problems than adjusting the hardware after an incorrect purchase.
When Replacement Is More Than a Simple DIY Job
Consider a cabinet professional or experienced handyman when the cabinet box is visibly out of square, the drawer box is warped, or the mounting surfaces are too damaged to hold new hardware securely.
Professional help also makes sense when:
- particleboard or MDF has failed around multiple mounting points
- the hardware is proprietary and cannot be confidently identified
- the drawer must be rebuilt or machined to accept a different undermount system
- several drawers have shifted because the cabinetry itself has moved
- a conversion requires significant cabinet modification
- you cannot establish a secure, parallel mounting position
A replacement slide cannot compensate reliably for a damaged or distorted drawer or cabinet.
Frequently Asked Questions
How do I know what replacement drawer slides I need?
Identify the existing slide type and manufacturer when possible, then record its length, mounting style, extension, clearance requirements, brackets or locking devices, and load needs. For undermount systems, confirm the required drawer construction as well.
Do replacement drawer slides need to be the same length?
Matching the existing length is often the simplest approach, but the correct choice depends on the drawer, cabinet depth, and manufacturer’s allowed dimensions. Do not choose a different length merely because it physically fits inside the cabinet.
Can I replace roller slides with ball-bearing slides?
Sometimes, but it may not be a direct replacement. The two systems can require different clearances, mounting positions, and drawer or cabinet arrangements. A conversion should be treated differently from a like-for-like drawer slide replacement.
Can I replace regular slides with soft-close slides?
Possibly, when the cabinet and drawer meet the new system’s mounting, clearance, load, and hardware requirements. Undermount soft-close runners may require specific locking devices and drawer preparation, so compatibility should be confirmed before ordering.
How do I measure drawer slides for replacement?
Measure the existing slide itself and record the drawer-box depth, usable cabinet depth, mounting position, required clearance, and any brackets or clips. Do not rely on drawer length alone or a universal clearance formula.
Final Thoughts
Successful drawer slide replacement starts before you remove the first screw. Identify the existing system, measure the hardware and available space, and match the mounting style, clearance, extension, load requirements, and related components.
Install both sides securely and parallel, then test the drawer before loading it. If damaged cabinet material, a warped drawer, or incompatible construction prevents secure mounting, address that problem rather than forcing new slides to fit.