faucet aerator stuck: how to remove it safely
A faucet aerator stuck on the spout is usually caused by mineral buildup, corrosion, overtightening, or the wrong removal method. The safest approach is to start gently, protect the faucet finish, and avoid forcing the aerator until you know what type you have.
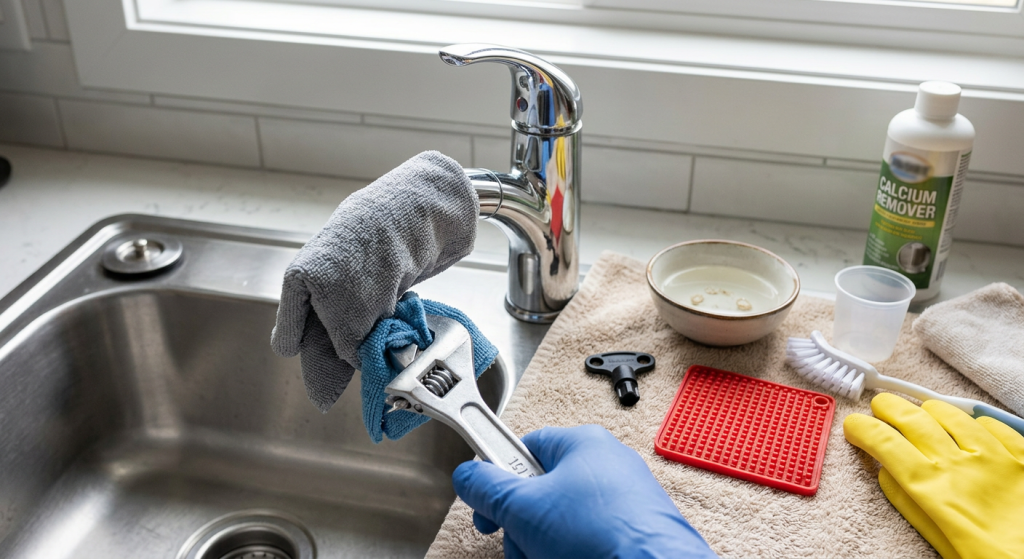
The aerator is the small screen or insert at the end of the faucet spout. It can clog with minerals and debris, causing weak flow or uneven spray. Many aerators twist off by hand, but some are recessed and need a small aerator key. Before using pliers or a wrench, try hand pressure, a cloth, rubber grip, and mild mineral cleaning first. Stop if the faucet body moves, leaks, or feels like it may break.
| What You Notice | Likely Cause | First Safe Check |
|---|---|---|
| Aerator will not turn by hand | Mineral buildup or overtightening | Try a cloth or rubber grip |
| No visible aerator edge | Recessed aerator | Look for an aerator key slot |
| White crust around spout | Hard water minerals | Soften buildup with vinegar |
| Faucet moves when twisted | Loose faucet or weak connection | Stop and call a plumber |
Faucet Aerator Stuck: Start With the Safest Checks
Before using any tool, take a close look at the faucet. The goal is to remove the aerator without scratching the finish, damaging the threads, or loosening the faucet body.
First, confirm what type of aerator you have. A standard aerator sits on the outside of the faucet tip and usually has a small metal ring you can grip. A recessed aerator sits inside the spout and may not have an obvious outer ring. Recessed styles often need a small plastic or metal aerator key.
Dry the faucet tip and your hands. A wet aerator is harder to grip, and slipping can scratch the finish if you are using a tool. Place a towel in the sink so small parts do not fall down the drain.
Check for mineral buildup around the edge. White, chalky crust often means hard water deposits have locked the aerator in place. Greenish or rusty discoloration may point to corrosion or older metal parts. These conditions do not always mean the aerator is ruined, but they do mean you should work slowly.
Gather a few simple supplies before you start
- Towel
- Soft cloth
- Rubber jar opener or rubber grip
- Small bowl
- Vinegar or mild mineral cleaner
- Aerator key, adjustable wrench, or pliers if needed
Avoid grabbing the aerator with bare metal pliers right away. That is one of the fastest ways to crush the aerator ring or leave marks on the faucet.
If the issue started with weak flow from only one fixture, compare these checks with our low water pressure in one faucet guide.
Try Hand Pressure, a Cloth, or Rubber Grip First
Start with the least aggressive method. Try turning the aerator by hand. Most standard aerators loosen by turning counterclockwise when looking up at the faucet tip from below. If you are looking down from above, the direction can feel reversed, so move slowly and pay attention.
If it does not move, wrap a soft cloth around the aerator and try again. The cloth gives your fingers a better grip and helps protect the finish.
A rubber jar opener can work even better. Rubber grips the metal without biting into it. Hold the faucet spout steady with one hand and turn only the aerator with the other. Do not twist the entire faucet.
If the faucet body shifts, flexes, or moves at the countertop, stop. That movement means you may be stressing the faucet mounting or supply connections below. A stuck aerator is not worth turning into a loose faucet or under-sink leak.
For a standard aerator, gentle hand pressure is often enough once the grip improves. If it begins to move, turn slowly. Do not rush. Mineral crust may make the threads feel gritty. Once removed, keep the parts in order so you can reinstall or match a replacement faucet aerator.
If the aerator starts to deform, stop. A crushed aerator can become harder to remove and may damage the faucet threads.
Use an Aerator Key or Gentle Tool Pressure Carefully
Some faucets have hidden or recessed aerators. These do not have a normal ring you can grab from the outside. Instead, the aerator sits inside the faucet spout and has small slots or teeth for an aerator key.
Look closely inside the spout with a flashlight. If you see notches, a recessed insert, or a plastic-looking center piece, you may need an aerator key. These keys come in different sizes, so the correct fit matters. A key that is too small can slip. A key that is too large may not seat properly.
Insert the key gently and turn slowly. Keep the pressure straight so you do not strip the slots. If the key slips repeatedly, stop and confirm the size before trying again.
For a standard external aerator that still will not turn, an adjustable wrench or pliers may help, but only with protection. Wrap the aerator with a cloth or thin rubber grip before placing the tool on it. Use light pressure and small movements.
Use tool pressure only if
- The aerator has a clear outer ring
- The faucet body feels solid and does not move
- The tool fits securely
- The finish is protected with cloth or rubber
- You can turn gently without crushing the aerator
- You are prepared to stop if the part slips or deforms
Do not clamp down hard. Aerators are small, and many are made from soft metal or plastic parts. Too much pressure can flatten the ring, scratch the spout, or damage the threads that hold the aerator in place.
If the aerator finally loosens, remove it over a towel or bowl. Small screens, washers, and inserts may fall out. Rinse the parts and inspect them before reinstalling. If the screen is damaged, the washer is cracked, or the threads are worn, a replacement aerator may be the better option.
When Mineral Buildup May Be the Problem
Hard water minerals are one of the most common reasons an aerator gets stuck. Minerals collect around the edge of the aerator and inside the threads. Over time, they can act almost like glue.
Vinegar can help soften light mineral buildup. Soak a cloth in vinegar and wrap it around the faucet tip. Let it sit long enough to loosen the crust, then wipe the area and try again with a rubber grip. For heavier buildup, you may need more than one round.
If the aerator is already removed, place the parts in a small bowl with vinegar and let the mineral deposits soften. Rinse everything well before reinstalling. Make sure the screen, washer, and any insert go back in the same order.
Do not use harsh scraping tools on the faucet finish. A plastic brush, soft cloth, or old toothbrush is safer than a knife, screwdriver, or metal pick.
If mineral buildup is severe, the aerator may come off but still be too clogged to work well. In that case, replacing the aerator is often simpler than trying to save every part. Match the size, thread type, and flow style before buying. Check current specifications so the new aerator fits your faucet.
Mineral buildup can come back, especially in hard-water homes. Cleaning the aerator occasionally can help prevent it from sticking again.
Common Mistakes to Avoid
A stuck aerator is a small problem, but it is easy to make worse with too much force. The faucet finish, aerator threads, and internal parts can all be damaged by the wrong method.
Avoid these common aerator-removal mistakes
- Grabbing the aerator with bare metal pliers
- Twisting the whole faucet instead of the aerator
- Forcing the wrong aerator key
- Scraping mineral buildup with sharp metal tools
- Crushing the aerator ring with a wrench
- Overtightening the aerator after cleaning
Also avoid assuming every faucet has a standard screw-on aerator. Many newer faucets use recessed or hidden aerators. If you cannot see a normal ring at the end of the spout, look for a key-style insert before using pliers.
When reinstalling, start the aerator by hand. If it does not thread smoothly, back it off and try again. Cross-threading can damage the faucet spout. Tighten only until it is snug and does not leak. More force is not better.
If the shutoff valve below the sink will not turn, review this water shut off valve wont turn guide before loosening faucet parts.
When to Stop and Call a Plumber
Stop and call a plumber if the faucet body moves when you twist the aerator, if water leaks from the faucet base, or if the aerator is so corroded that it starts breaking apart. These are signs that the problem may involve more than a stuck screen.
You should also stop if the recessed aerator slots are stripped, the key will not grip, or the faucet finish is starting to scratch despite protection. At that point, more force is likely to cause damage.
If the faucet is old, loose, leaking under the sink, or connected to worn shutoff valves, do not keep working on it. A plumber can remove the stuck part without putting extra stress on the faucet, countertop, or supply connections.
Call for help sooner if you are not sure what type of aerator you have. Guessing with tools can turn a simple low-flow fix into a damaged faucet.
Final Thoughts
A stuck faucet aerator is usually caused by mineral buildup, corrosion, overtightening, or a recessed design that needs the right key. Start with hand pressure, a cloth, or a rubber grip before using tools.
Protect the faucet finish, avoid excessive force, and use vinegar only for mild mineral buildup. If the faucet moves, leaks, scratches, or the aerator starts to deform, stop. A careful approach can often remove the aerator safely, but forcing it can create a bigger repair.