
garage door seal replacement guide
A worn bottom or perimeter seal can let light, drafts, insects, debris, and water into the garage. In most cases, garage door seal replacement is a manageable maintenance job when the door itself operates normally, and the work is limited to accessible weatherstripping.
Start by identifying which seal is failing and matching the replacement to the existing attachment system. Bottom seals are not universal, so inspect the seal profile and retainer before buying or removing anything.
| What you notice | Likely seal problem | Best next step |
|---|---|---|
| Light under closed door | Worn or compressed bottom seal | Inspect seal and floor |
| Cold draft | Bottom or perimeter seal gap | Locate the leaking edge |
| Water blowing under door | Poor bottom contact | Inspect seal and drainage |
| Torn bottom seal | Physical seal damage | Replace compatible seal |
| Hard or flattened rubber | Aged, compressed seal | Plan replacement |
| Gap only at one corner | Floor or door alignment issue possible | Check door position before replacing |
| Side or top light gap | Worn perimeter weatherstripping | Inspect jamb and top seals |
Garage doors are heavy, and their springs and lift cables store substantial energy. Keep the door fully closed during routine seal replacement, keep your hands clear of pinch points, and never loosen springs, lift cables, bottom brackets, or other high-tension hardware. Stop if the door is crooked, off track, unusually heavy, unstable, or mechanically damaged.
Signs Your Garage Door Seal Needs Replacement
Garage-door weatherstripping gradually deteriorates from temperature changes, sunlight, compression, moisture, road salt, dirt, and repeated contact with the garage floor.
Replacement is worth considering when you find:
- Cracks, tears, missing sections, or crumbling material
- Rubber or vinyl that has become hard and no longer flexes
- A bottom seal that stays flattened after the door opens
- Daylight visible along the bottom, sides, or top
- Persistent drafts, insects, leaves, or debris entering around the door
- Minor wind-driven rain getting beneath a visibly damaged seal
A bottom seal can reduce ordinary weather intrusion, but it is not a waterproof dam. If substantial runoff routinely flows toward the garage, driveway slope, drainage, or slab elevation may be the larger problem.
What Type of Garage Door Seal Do You Have?
Bottom seals vary by both shape and retainer design. Common possibilities include T-style ends, bulb-style profiles, U-shaped seals, and other manufacturer-specific shapes. Retainers may have a single channel, two channels, or a different attachment arrangement.
Before removing the old seal:
- Look at the exposed end of the existing seal.
- Inspect how it fits into the metal or plastic retainer.
- Note whether one or two channels hold the seal.
- Compare the old profile with the proposed replacement.
- Confirm compatibility with your door or retainer whenever possible.
Do not assume similar-looking seals are interchangeable, and do not force a mismatched profile into the retainer.
For the basic job, you may need a tape measure, cleaning cloth, non-damaging brush, cutting tool suitable for the seal material, and any fastener-removal tool specifically required by your weatherstripping system.
Step 1: Measure the Door and Identify the Seal Profile
Measure the full width of the garage door and compare that measurement with the existing seal length.
Record:
- Door width
- Existing seal profile
- Number and arrangement of retainer channels
- Condition of the retainer
- Existing seal length
Buy enough replacement material to span the entire width while leaving practical trimming room. There is no single extra-length allowance that applies to every seal, so follow the replacement manufacturer’s sizing instructions.
Step 2: Buy a Compatible Replacement Seal
Match the replacement to the retainer rather than choosing only by door width.
A replacement seal should fit the existing channel or fastening method without excessive force. Check product-specific instructions for profile, material, orientation, installation method, and trimming guidance.
Inspect the retainer at the same time. A severely bent, cracked, loose, or heavily corroded retainer can prevent a new seal from seating correctly and may require garage-door service rather than weatherstripping alone.
Step 3: Close the Door and Make the Work Area Safe
Fully close the garage door and keep the area around it clear. Disconnect opener power when the manufacturer’s instructions or your work location call for preventing accidental door operation.
Work from the floor or another stable position. Do not work beneath a door that appears unstable.
The bottom corner brackets on many sectional garage doors provide attachment points for the lift cables. Do not loosen or remove those brackets as part of seal replacement. Do not disconnect cables or disturb the spring system.
Step 4: Remove the Old Bottom Seal
Determine how your specific seal is retained. Some slide through a channel; others use system-specific retainers or approved end features.
Remove an end stop only when the particular retainer requires it and the part is clearly separate from the door’s cable, spring, track, or structural hardware.
Then gradually slide or pull the worn seal from the retainer. Older seals can become stiff, brittle, or difficult to move. If practical, cutting the disposable seal into manageable sections can make removal easier, provided you can do so without cutting near cables or other mechanical hardware.
Step 5: Clean the Retainer Channel
Remove dirt, grit, dried residue, and loose corrosion with a cloth or non-damaging brush. Cleaning the channel can make the new seal easier to feed through and help it sit evenly.
Do not aggressively grind, pry open, bend, or reshape the retainer. If it is loose, badly corroded, cracked, or visibly distorted, stop and have the retainer evaluated before forcing in a new seal.
Step 6: Install the New Garage Door Bottom Seal
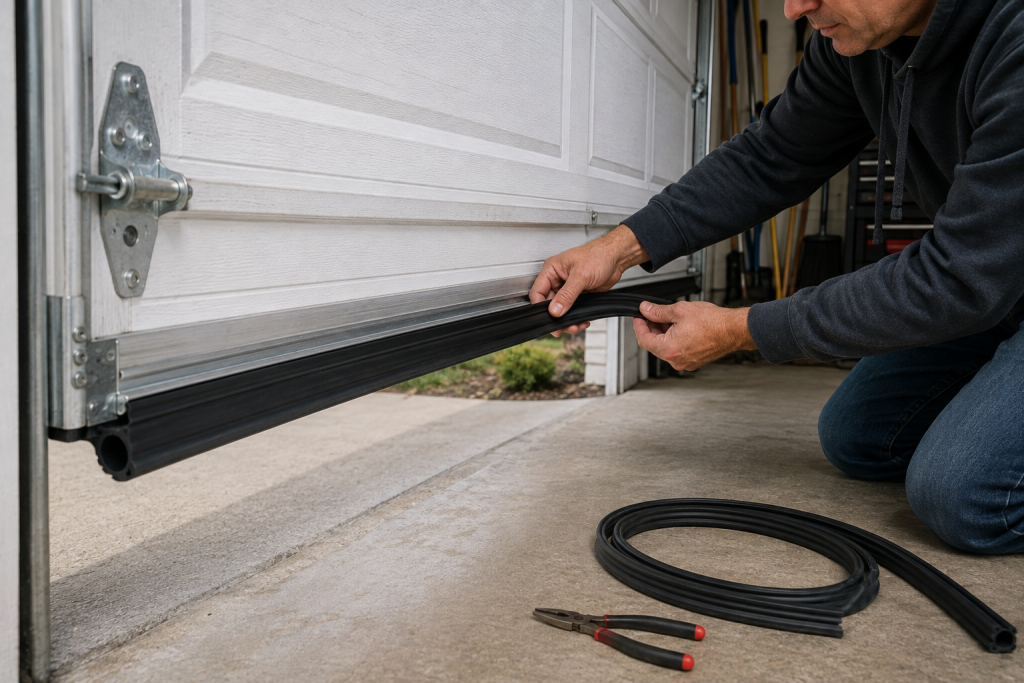
Orient the seal according to its instructions, then start feeding it into the correct retainer channel from one end.
Move gradually across the door. On a wide door, a helper can make it easier for one person to feed the seal while the other guides it through the retainer.
If the product instructions permit lubrication, use only a compatible product or approved soapy solution. Avoid petroleum-based lubricants unless the seal manufacturer specifically allows them because incompatible products can damage some rubber and vinyl materials.
Do not stretch the seal excessively while pulling it into place. Stretching can cause it to shrink back and leave the ends short later.
Step 7: Trim and Check the Fit
Once the seal is fully positioned, allow it to relax before making the final trim. Cut the ends as directed for that particular product and reinstall any manufacturer-approved retainer stops that were removed.
With the door closed, inspect the entire bottom edge.
The seal should:
- Contact the floor across the opening
- Compress enough to close ordinary small gaps
- Remain reasonably even from side to side
- Avoid excessive bunching or distortion
Operate the door afterward and make sure the new seal does not create abnormal resistance.
Replacing Side and Top Garage Door Weatherstripping
Side and top weatherstripping is commonly attached to the jamb or trim surrounding the opening rather than to the moving door itself. Perimeter seals are intended to limit weather and light infiltration around these edges.
Remove the old weatherstripping using the fastening method provided for that system, clean the mounting surface, measure the replacement, and install matching material.
With the garage door closed, the flexible edge should lightly contact the door. It should not be pressed so tightly against the panels that it creates drag, catches the door, or interferes with movement.
After installation, run the door through a complete opening and closing cycle and watch the side and top seals for binding.
When a New Seal Will Not Fix the Gap
A new weather seal can conform to small, normal surface irregularities. It cannot compensate for major differences in floor height or correct a mechanical problem with the door.
Persistent gaps can result from:
- Uneven or settled concrete
- A damaged bottom retainer
- A crooked or off-track door
- Damaged rollers
- Bent tracks
- Misaligned door panels
- Improper door balance
- Structural movement around the opening
A large gap concentrated at one corner is especially important to investigate before assuming a thicker seal is the answer.
Do not adjust tracks, cables, springs, panels, or door balance to make weatherstripping fit. Those repairs fall outside routine seal replacement.
Common Garage Door Seal Replacement Mistakes
Avoid these common problems:
- Buying a seal before identifying the existing profile
- Failing to inspect the retainer for damage
- Forcing an incompatible profile into the channel
- Stretching the seal while installing it
- Cutting the replacement too short
- Using a lubricant that is incompatible with the seal
- Removing cable-connected bottom brackets
- Expecting weatherstripping to compensate for a severely uneven floor
- Ignoring a crooked or mechanically damaged door
- Installing side seals tightly enough to bind against the moving door
Product-specific instructions should control the final installation method whenever they differ from general guidance.
When to Call a Garage Door Professional
Stop the weatherstripping job and arrange professional service if you find a damaged or loose retainer that cannot be addressed without disturbing door hardware, or if the door itself appears crooked, off track, poorly balanced, or mechanically damaged.
Professional service is also appropriate when the repair would require work on bottom brackets, lift cables, springs, rollers, tracks, structural door components, or alignment.
If the weather seal is fine but the door will not move normally, see Garage Door Opener Not Working: What to Check for safe first checks. For routine maintenance separate from seal replacement, How to Lubricate a Garage Door explains which moving components normally need attention.
Final Thoughts
Successful garage-door weatherstripping starts with identifying the existing seal and retainer before buying a replacement. Measure carefully, keep the door closed and stable, clean the retainer, install the compatible seal without excessive stretching, and verify that it closes gaps without interfering with door movement.
If a new seal still leaves a large corner gap or the door looks uneven, stop treating the problem as weatherstripping. Floor irregularities and mechanical door problems need to be addressed separately rather than hidden with an oversized or incorrectly fitted seal.