Paint Flashing Over a Drywall Patch: Why It Happens
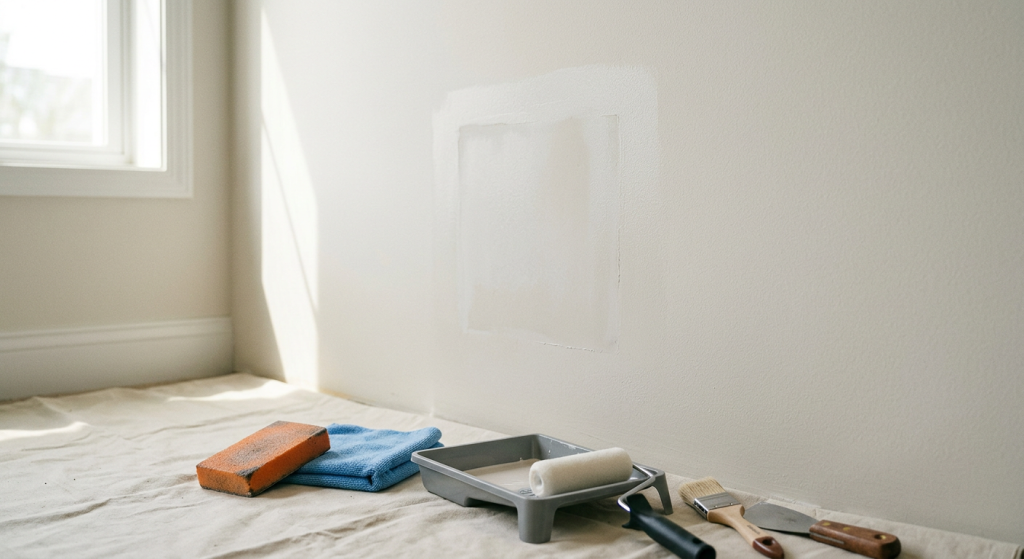
Paint flashing over drywall patch repairs usually happens because the patched area absorbs paint differently than the surrounding wall. The repair may be smooth and painted, but it can still show as a dull spot, shiny spot, lighter spot, darker spot, or visible outline when light hits it.
This is common after filling holes, sanding spackle, repairing dents, or patching damaged drywall. The patch surface is not the same as the painted wall around it. Joint compound, spackle, and bare drywall are more porous, so they soak up paint faster unless they are sealed first.
The good news is that flashing can usually be fixed. The main solution is to smooth the patch, remove dust, apply the right primer, and repaint the area correctly. For some repairs, a small touch-up is enough. For others, repainting the full wall is the cleaner option.
What Paint Flashing Means
Paint flashing means one part of the wall reflects light differently than the rest of the wall.
It does not always mean the color is wrong. Sometimes the color matches, but the sheen does not. The patched spot may look flatter, glossier, rougher, or slightly shadowed compared to the surrounding paint.
Flashing is often easiest to see from an angle. A wall may look fine when you stand straight in front of it, then show the patch clearly when sunlight or a lamp hits the surface from the side.
Paint flashing may look like:
- A dull patch in the middle of the wall
- A shiny spot over the repair
- A lighter or darker area after painting
- A visible patch outline
- A rough or smooth spot that catches light
- A touch-up mark that does not blend
- A repaired area that shows more at certain times of day
Flashing is especially noticeable on walls with satin, semi-gloss, or glossy paint because those finishes reflect more light.
A similar problem can happen when touch-up paint looks shiny because the sheen or texture does not match the surrounding wall.
Paint Flashing Over Drywall Patch: Common Causes and Fixes
| Cause | What It Looks Like | Why It Happens | Basic Fix |
|---|---|---|---|
| No primer | Dull or uneven patch | Spackle or joint compound absorbs paint too fast | Sand, wipe, prime, repaint |
| Poor sanding | Raised or rough repair | Texture does not match the wall | Sand smooth, clean, repaint |
| Dust on patch | Patch looks blotchy or weak | Paint cannot bond evenly | Wipe dust, prime, repaint |
| Wrong sheen | Touch-up looks shiny or flat | Paint finish does not match | Use matching sheen or repaint wall |
Why Drywall Patches Flash Through Paint
Drywall patches flash because the repair area is different from the finished wall. Even when the patch feels smooth, it may still absorb paint unevenly.
A painted wall already has a sealed surface. A fresh patch does not. Spackle, joint compound, and sanded drywall are porous. If you paint directly over them, the paint may sink into the patch more than it sinks into the surrounding painted area.
That uneven absorption changes the way the dried paint looks. The patch may appear dull, flat, or slightly different in color.
Primer helps reduce this problem by sealing the patch before the finish paint goes on.
One common cause is skipping primer, which is why this guide on how many coats of primer over spackle is helpful before repainting patched spots.
Cause 1: Uneven Paint Absorption
Uneven absorption is the most common reason for flashing. The patched area drinks in the paint, while the surrounding painted wall does not.
This can happen even if you use the correct paint color from the original can. The issue is not always color. It is often the way the paint dries over two different surfaces.
Bare patching compound and old painted wall surfaces do not behave the same way. Without primer, the topcoat may dry with a different sheen over the patch.
Uneven absorption is more likely when:
- The patch is larger than a tiny nail hole
- The repair was made with spackle or joint compound
- The surface was sanded down to bare patch material
- The wall paint has a satin, semi-gloss, or gloss finish
- The room has strong side lighting
- The paint color is dark or bold
- Only the patch was painted instead of a larger area
A regular drywall primer is usually the right product for clean patches. It seals the repair so the finish paint has a more even surface.
Cause 2: Skipping Primer
Skipping primer is another common reason for paint flashing over a drywall patch. Paint alone often does not seal bare spackle or joint compound well enough.
For very tiny nail holes, you may get away with a careful touch-up. But once the patch is big enough to sand, it is usually big enough to prime.
Primer does not need to be thick. A thin, even coat is usually better than a heavy coat. The goal is to seal the patch, not build up a raised spot.
Primer is usually recommended when:
- The patch is bigger than a small nail hole
- You sanded the repair smooth
- The patch looks chalky or dull
- The repair is in a bright room
- The wall has satin, semi-gloss, or glossy paint
- The final paint color is dark or deep
- The patch is on a highly visible wall
For ordinary repairs, use drywall primer or interior primer. If there is a water stain, smoke stain, marker mark, or other discoloration, use a stain-blocking primer instead.
If you are not sure whether primer is needed, this guide on whether you can paint over spackle without primer explains when skipping primer may work and when it can cause visible patches.
Cause 3: The Paint Sheen Does Not Match
Sometimes the patch flashes because the paint sheen does not match the existing wall. This can happen even when the paint color is correct.
Paint sheen describes how shiny the paint is. Flat paint reflects less light. Eggshell and satin reflect more. Semi-gloss and gloss reflect even more.
If the original wall is eggshell and the touch-up paint is satin, the patch may look shiny. If the wall is satin and the touch-up dries flatter because it soaked into the patch, the repair may look dull.
Old paint can also change over time. Dirt, cleaning, sunlight, and normal wear can make the wall surface different from fresh paint. That is why touch-ups on older walls may still show.
Cause 4: Poor Sanding or Patch Texture
Primer and paint cannot hide a rough patch. If the repair has ridges, edges, bumps, or sanding scratches, the finished paint may still show the patch.
A smooth wall repair starts before primer. The spackle or joint compound should be feathered out, allowed to dry, and sanded smooth. The edges should blend into the wall without a raised border.
A sanding sponge is a helpful tool because it gives beginner homeowners better control than loose sandpaper. Use light pressure and check the patch often.
Watch for these texture problems:
- Raised patch edges
- Lumpy spackle
- Scratches from aggressive sanding
- A patch that is smoother than the surrounding wall
- A patch that is rougher than the surrounding wall
- Thick paint or primer ridges
- Brush marks on a wall that was originally rolled
A mini roller can help match the light texture of a rolled wall. A touch-up brush is useful for corners and tiny spots, but it can leave brush marks on larger patches.
Cause 5: Dust Left on the Patch
Sanding dust can cause flashing because it keeps primer or paint from bonding evenly. It can also make the surface look chalky, rough, or blotchy.
After sanding, always wipe the patch before priming or painting. A clean microfiber cloth works well for small repairs. You do not need to soak the wall. The goal is to remove loose dust.
If dust is left behind, the primer may sit on the dust instead of sealing the patch. That can leave the repair looking uneven after the finish paint dries.
Before priming, make sure the patch is:
- Fully dry
- Smooth to the touch
- Free of loose dust
- Free of crumbling compound
- Blended at the edges
- Clean around the repair area
This is a small step, but it makes a big difference. Primer works best when it is applied to a clean, stable surface.
Cause 6: Applying Paint Too Thick
It may seem like more paint will hide the patch better, but thick paint often makes flashing worse. Heavy paint can leave raised edges, roller marks, brush marks, or a different texture.
The same is true for primer. Heavy primer buildup is not the goal. Thick coats can create a visible patch even after the wall is painted.
Use thin, even coats and let each coat dry properly. If the patch still shows after one coat of paint, a second light coat is usually better than one heavy coat.
Cause 7: Lighting Angle Makes the Patch More Visible
Some flashing is made worse by lighting. Side lighting from windows, lamps, hallway lights, or ceiling fixtures can make small surface differences easier to see.
This does not mean you imagined the problem. It means the wall surface is reflecting light unevenly.
A patch on a flat wall with soft light may disappear easily. The same patch on a wall beside a window may show every edge, sanding mark, and sheen difference.
When checking your repair, look at it from different angles before deciding the job is done.
How Primer Helps Reduce Flashing
Primer helps reduce flashing by sealing the porous patch before paint is applied. It creates a more even surface so the finish coat does not soak into the repair as much.
For clean spackle or joint compound, drywall primer is usually enough. For stained areas, a stain-blocking primer may be needed. For glossy or difficult surfaces, a bonding primer may be useful, but it is not usually necessary for a normal drywall patch.
Primer also helps you see whether the patch is smooth before you apply the final paint. Once the primer dries, rough edges or missed spots are often easier to notice.
Primer helps with:
- Sealing porous spackle
- Sealing joint compound
- Reducing dull spots
- Reducing shiny spots
- Evening out paint absorption
- Helping the topcoat look more consistent
- Making small surface problems easier to spot before painting
A small paint tray, mini roller, and touch-up brush are usually enough for spot priming. You do not need to coat the wall heavily. Keep the primer smooth and thin.
Step-by-Step Fix for Paint Flashing Over a Drywall Patch
The best fix depends on why the patch is flashing. In most cases, the repair process is the same: smooth the area, clean it, prime it, and repaint it.
Do not start by adding thick paint over the flashing spot. That can make the wall texture worse.
Fix paint flashing this way:
- Let the paint dry fully before judging the repair.
- Look at the patch from straight on and from an angle.
- Lightly sand any raised edges, rough spots, or brush marks.
- Wipe away dust with a microfiber cloth.
- Apply a thin coat of drywall primer over the patch.
- Feather the primer slightly beyond the repair edges.
- Let the primer dry according to the label.
- Paint the primed area with matching wall paint.
- Use a mini roller if the surrounding wall has roller texture.
- Add a second light coat of paint if needed.
Feathering means lightly extending the primer and paint beyond the patch so there is not a hard stop line. This helps the repair blend into the surrounding wall.
If the wall is older, faded, or has a sheen that is hard to match, the spot may still show after touch-up. In that case, repainting the full wall may be the better fix.
When a Small Touch-Up Is Enough
A small touch-up may be enough when the patch is tiny and the wall paint is easy to blend. This is most realistic for small nail holes, pinholes, or very minor spackle repairs.
Touch-ups are more forgiving on flat or matte walls. They are less forgiving on satin, semi-gloss, dark colors, and walls with strong natural light.
A small touch-up may work when:
- The patch is very small
- The wall has flat or matte paint
- The paint color is light
- The room has soft lighting
- The paint is from the original wall color
- The wall was painted recently
- The repair is in a low-visibility area
For tiny spots, a touch-up brush may be enough. Use very little paint and avoid creating a raised dot. For anything larger, a mini roller usually blends better.
When Repainting the Full Wall Is Better
Repainting the full wall is better when the patch keeps showing, even after sanding, priming, and repainting. This does not mean the repair failed. It often means the old wall paint and the new paint are not blending well.
A full-wall repaint gives your eye natural stopping points at corners, trim, and ceiling lines. That makes slight color or sheen differences much less obvious.
Repaint the full wall when:
- The patch is large
- There are several patches on the same wall
- The wall paint is old or faded
- The wall has satin, semi-gloss, or gloss paint
- The paint color is dark or bold
- The patch is in strong side lighting
- The touch-up still shows after proper priming
- The wall has visible roller or brush texture differences
Use painter’s tape to protect trim and edges. A good roller cover can help create a more even finish across the full wall. Match the roller nap to the wall texture and use consistent pressure.
Tools and Supplies That Help Fix Flashing
You do not need a complicated setup to fix paint flashing, but the right small tools help a lot. Most beginner homeowners can handle this repair with basic patching and painting supplies.
Helpful tools and supplies include:
- Drywall primer for clean patches
- Stain-blocking primer for stained patches
- Sanding sponge for smoothing the repair
- Microfiber cloths for removing dust
- Mini roller for blending patch texture
- Roller covers that match the wall texture
- Touch-up brushes for small spots and corners
- Small paint tray for primer or paint
- Painter’s tape for protecting trim
- Spackle or joint compound for patch touch-ups
- Putty knife for smoothing repair material
A mini roller is one of the most useful tools for patch repairs because many walls have a light roller texture. If you use only a brush on a larger patch, the brush marks may stand out after the paint dries.
Common Mistakes When Trying to Fix Flashing
Flashing is frustrating, so it is easy to keep adding more paint. That usually is not the best solution.
The cleaner fix is to correct the surface problem first. Then prime and paint with thin, even coats.
Avoid these common mistakes:
- Painting over the patch before it is fully dry
- Skipping primer on a visible repair
- Using thick paint to hide the patch
- Applying heavy primer buildup
- Sanding too aggressively
- Leaving sanding dust on the wall
- Using the wrong paint sheen
- Touching up with old paint that no longer matches
- Using a brush on a large rolled-wall patch
- Ignoring stains under the patch
- Repainting only the patch when the full wall needs paint
If a stain is involved, regular drywall primer may not be enough. Use a stain-blocking primer when there is water discoloration, smoke staining, marker, grease, or other bleed-through risk.
How to Prevent Flashing on Future Drywall Patches
The best way to prevent flashing is to treat every visible patch as a surface-prep job, not just a paint job. The patch needs to be smooth, clean, sealed, and painted with the right technique.
A little extra care before painting can save you from having to redo the wall later.
Use this process for future patches:
- Apply spackle or joint compound smoothly.
- Let the patch dry fully.
- Sand the repair flush with the wall.
- Wipe away all dust with a microfiber cloth.
- Spot prime the patched area with drywall primer.
- Use stain-blocking primer if the repair has discoloration.
- Feather primer slightly past the patch.
- Let primer dry fully.
- Paint with the correct color and sheen.
- Use a mini roller when matching a rolled wall texture.
- Repaint the full wall when touch-up blending is unlikely.
For small repairs, keep a basic kit with spackle, a putty knife, sanding sponges, drywall primer, a small paint tray, a mini roller, a touch-up brush, microfiber cloths, and painter’s tape. Having the right supplies nearby makes it easier to do the repair correctly the first time.
Final Thoughts
Paint flashing over a drywall patch usually happens because the repaired area absorbs paint differently, has a different texture, or reflects light differently than the rest of the wall. Skipped primer, poor sanding, leftover dust, wrong sheen, thick paint, and strong lighting can all make the patch more visible.
The fix is usually straightforward. Let the area dry, sand it smooth, wipe away dust, apply a thin coat of the right primer, and repaint with the correct paint and tool. For small patches, a careful touch-up may be enough. For larger or more visible repairs, repainting the full wall often gives the cleanest result.
Do not try to bury flashing under heavy paint or primer. A smooth patch, clean surface, proper primer, and light even coats are what help the repair blend in.