How many coats of primer over spackle do you need?
How many coats of primer over spackle you need depends on the size of the patch, the primer you use, and how visible the repair area is, but most small spackle repairs only need one coat of primer before painting.
A second coat may help if the patch is large, very porous, still showing through the first coat, or located on a wall with a noticeable sheen. The goal is not to build up a thick layer of primer. The goal is to seal the spackle so the paint absorbs evenly and blends with the surrounding wall.
For most homeowner touch-ups, the right process is simple: let the spackle dry, sand it smooth, wipe away dust, apply primer, let it dry, and then paint.
How Many Coats of Primer Over Spackle Is Usually Enough?
For small nail holes, picture hanger holes, and minor wall dents, one coat of primer is usually enough over spackle. The primer seals the repaired spot so the finish paint does not soak in unevenly.
For larger repairs, deeper patches, or areas where the first coat of primer still looks blotchy after drying, two thin coats may be better.
| Spackle Repair | Primer Needed | Best Primer Method | Notes |
|---|---|---|---|
| Tiny nail hole | 1 coat | Touch-up brush | Keep primer thin and controlled |
| Small dent or scrape | 1 coat | Brush or mini roller | Feather slightly past the patch |
| Larger patch | 1 to 2 coats | Mini roller | Helps blend texture and sheen |
| Stained or discolored patch | 1 to 2 coats | Stain-blocking primer | Use only when stain blocking is needed |
One good coat is better than several heavy coats. Too much primer can leave a raised spot, create texture differences, or make the repair more noticeable after painting.
Why Spackle Needs Primer Before Paint
Spackle is more porous than a painted wall. When you paint directly over it, the spackled area can absorb paint differently than the surrounding surface.
That difference can cause the patch to show, even after the paint dries. The repair may look dull, shiny, lighter, darker, or slightly cloudy compared with the rest of the wall.
Primer helps seal the spackle so the paint sits more evenly on the surface.
Primer helps prevent:
- Flashing
- Dull spots
- Shiny spots
- Uneven paint absorption
- Visible patch outlines
- Color differences over the repair
- Paint soaking into the spackle too quickly
Flashing is one of the biggest reasons patched spots stand out. It happens when one part of the wall reflects light differently from the rest of the surface.
Even if the color matches, the sheen can make the patch visible. Primer helps reduce that problem by creating a more even base for paint.
When One Coat of Primer Is Enough
One coat of primer is usually enough when the repair is small, smooth, fully dry, and not stained.
This is the most common situation for basic homeowner wall repairs. If you filled a few nail holes or small dents before repainting, you probably do not need multiple coats of primer.
One coat is usually enough when:
- The spackle patch is small
- The repair is fully dry
- The patch has been sanded smooth
- The wall is not stained
- The spackle is not showing heavily through the primer
- You are using a good primer made for interior walls
- The final paint color is close to the existing wall color
- The area is not in strong side lighting
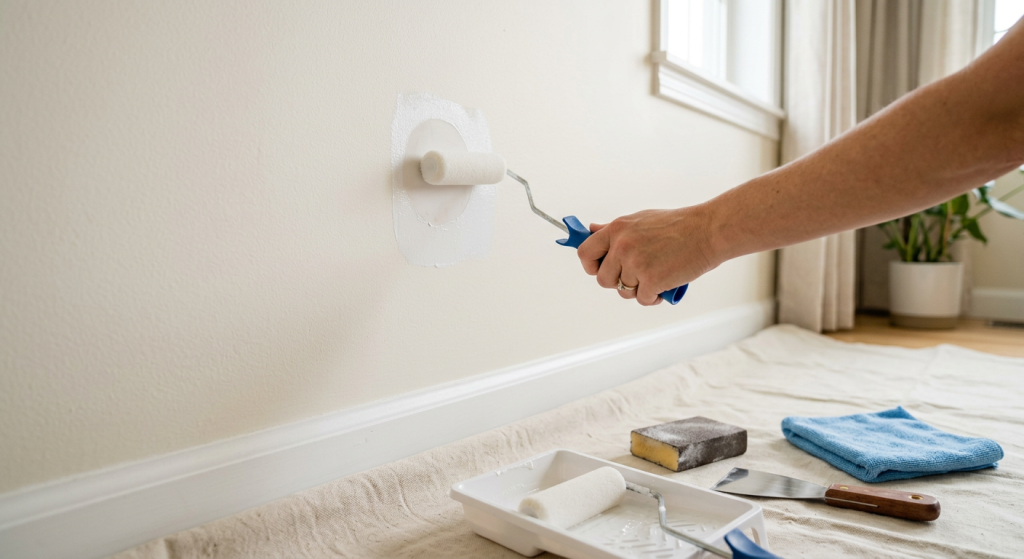
For a tiny patch, a touch-up brush works well. Dip lightly into the primer, cover the spackle, and feather the edges slightly onto the surrounding wall.
For several small patches, pour a little primer into a small paint tray and use a mini roller. A mini roller can help the primed area blend better with the roller texture already on the wall.
When Two Coats of Primer May Be Needed
Two coats of primer may be helpful when one coat does not fully seal the repair or when the patched area is more likely to show through the finish paint.
Use thin coats, not heavy coats. Let the first coat dry before deciding whether a second coat is actually needed.
Two coats may help when:
- The spackle patch is large
- The repair still looks porous after the first coat
- The first coat dries blotchy
- You are painting with a glossy or higher-sheen finish
- The wall gets strong natural light
- The final paint color is dark, bright, or very different
- The repair was made over damaged drywall paper
- The patch is in a highly visible area
- You are trying to cover a stain or discoloration
If the wall has a stain, water mark, smoke mark, or tannin bleed, regular drywall primer may not be enough. A stain-blocking primer is usually the better choice for those spots.
Do not use stain-blocking primer just because the repair is small. Use it when there is a stain or discoloration that could bleed through the paint.
Drywall Primer vs Stain-Blocking Primer
Different primers solve different problems. For normal spackle repairs, a general interior drywall primer or wall primer is usually enough.
Drywall primer helps seal porous patches and creates a more even surface for paint. It is a good choice for everyday spackle repairs on painted drywall.
Stain-blocking primer is for problem areas where a stain may come through the paint. This can include old water stains, smoke marks, rust marks from fasteners, or other discoloration.
A simple way to choose primer:
- Use drywall primer for ordinary spackle patches
- Use stain-blocking primer for stained or discolored areas
- Use a small touch-up brush for tiny repairs
- Use a mini roller for larger patches or multiple repairs
- Use a small paint tray to avoid overloading the brush or roller
Primer should be applied neatly and evenly. You do not need to bury the patch under primer. You only need to seal it.
For a deeper primer breakdown, see this guide to choosing the best primer for patched drywall before painting.
The Correct Order: Spackle, Dry, Sand, Wipe, Prime, Dry, Paint
Good primer results start before the primer goes on. If the spackle is soft, dusty, uneven, or not fully dry, primer will not fix the repair.
Follow the repair process in the right order and take your time between steps.
The correct order is:
- Apply spackle to the damaged area
- Let the spackle dry completely
- Sand the patch smooth with a sanding sponge
- Wipe away dust with a clean microfiber cloth
- Apply one thin coat of primer
- Let the primer dry according to the label
- Add a second thin coat only if needed
- Let the primer dry again
- Paint the repair area
- Blend the paint into the surrounding wall
A sanding sponge is useful because it gives you control and helps smooth the edges of the patch. Do not oversand. The goal is to make the patch level with the wall, not remove all the spackle.
After sanding, always wipe with a microfiber cloth. Primer does not bond well to sanding dust.
If you are not sure whether the patch is dry enough yet, start with this guide on how long spackle should dry before painting.
Should You Prime Only the Patch or a Wider Area?
For very small repairs, you can usually prime just the spackled spot and slightly beyond the edges.
For larger patches, it is better to prime a little wider than the repair. This helps blend the surface and reduces the chance of a visible outline.
The key is to feather the primer outward. Do not stop with a thick, hard edge around the patch.
Use this simple guide:
- For a nail hole, prime just the spot and a small area around it
- For a small dent, prime the patch and feather slightly beyond it
- For a larger repair, use a mini roller and prime a wider area
- For several patches close together, prime the whole grouped area
- For a heavily repaired wall section, consider priming the full wall section before painting
Painter’s tape can help protect trim, outlets, or nearby surfaces when a patch is close to an edge. Press the tape down gently, and remove it carefully after painting so you do not pull up fresh finish.
For the smoothest look, avoid creating a raised primer island. Thin, feathered coats usually blend better than thick, tight coats.
How to Apply Primer Over Spackle
Primer over spackle should be thin, even, and controlled. You are sealing the repair, not trying to hide bad sanding or fill low spots with primer.
Use a touch-up brush for tiny spots. Use a mini roller for patches that are larger than a small nail hole or for multiple repairs on the same wall.
A small paint tray makes it easier to load the roller evenly without using too much primer.
Basic primer steps:
- Stir the primer before using it
- Pour a small amount into a small paint tray
- Load the brush or mini roller lightly
- Apply primer over the spackle
- Feather the primer slightly beyond the patch
- Smooth out drips, ridges, or heavy edges
- Let the primer dry fully
- Check the surface before painting
If the first coat dries evenly and the patch no longer looks porous, you can usually move on to paint.
If the patch still looks dry, chalky, or uneven after the first coat dries, apply a second thin coat of primer.
How Long Should Primer Dry Before Painting?
Primer needs time to dry before paint goes over it. The exact drying time depends on the primer type, room temperature, humidity, airflow, and the manufacturer’s label.
Some primers dry quickly, but that does not always mean they are ready for paint immediately. Follow the label on the primer container.
Primer is usually ready for paint when:
- It feels dry, not tacky
- The surface looks even
- There are no wet or shiny primer spots
- The patch does not feel soft underneath
- The primer does not lift when lightly touched
- The room conditions match the product instructions
Do not rush paint over wet primer. Painting too soon can cause poor adhesion, uneven sheen, or a patch that still shows after the wall dries.
Common Mistakes When Priming Over Spackle
Most primer problems come from rushing the job or using too much product.
Primer is important, but it cannot fix a patch that was not sanded, cleaned, or dried correctly.
Avoid these common mistakes:
- Priming before the spackle is fully dry
- Skipping sanding before primer
- Leaving sanding dust on the wall
- Applying primer too thick
- Using several coats when one thin coat is enough
- Priming only the exact patch without feathering the edges
- Painting before the primer dries
- Using regular primer over a stain that needs stain-blocking primer
- Using a large roller that creates a different wall texture
- Ignoring the primer label
Another common mistake is expecting paint to hide an uneven repair. Paint can cover color differences, but it usually makes bumps, ridges, and rough patches more obvious.
If the patch feels uneven after primer, stop and fix the surface before painting.
What If the Patch Still Shows After Painting?
If the patch still shows after painting, look closely at what kind of problem you have. The fix depends on whether the issue is color, sheen, texture, or an uneven patch.
Do not keep adding heavy paint over the same spot. That can build up texture and make the repair stand out more.
Check for these problems:
- The patch looks dull compared with the wall
- The patch looks shiny compared with the wall
- The color does not match
- The texture is smoother than the surrounding wall
- The patch is raised
- The patch is sunken
- The edges are visible
- The paint coverage is uneven
If the issue is dullness or uneven absorption, the patch may need another thin coat of primer and another coat of paint.
If the repair still looks dull or shiny after repainting, this guide to paint flashing over a drywall patch explains why the patched area reflects light differently.
If the issue is texture, the patch may need light sanding and repainting.
If the patch is raised, sand it smooth, wipe it clean, prime again, and repaint.
If the patch is sunken, apply another thin layer of spackle, let it dry, sand it smooth, prime, and paint.
Do You Always Need Primer Over Spackle?
For the best finish, primer is recommended over most spackle repairs. That does not mean every tiny pinhole needs a large primed area.
On a very small nail hole, some homeowners touch up directly with paint, especially if they have the exact same paint and the wall has a flat finish. This can work, but it is less reliable.
Primer becomes more important as the patch gets larger, more visible, or more porous.
Primer matters most when:
- The patch is larger than a tiny nail hole
- The wall has eggshell, satin, semi-gloss, or gloss paint
- The repair is in a bright room
- The patch is at eye level
- The paint color is hard to match
- The spackle absorbed the first touch of paint unevenly
- You want the repair to disappear as much as possible
A small amount of primer can save you from repainting the same patch several times.
Final Thoughts
For most small repairs, one coat is the practical answer to how many coats of primer over spackle you need. It seals the patch, helps the paint absorb evenly, and reduces dull spots, shiny spots, and flashing.
Use two thin coats only when the first coat does not fully seal the repair, the patch is large, or the area has a stain that needs extra coverage.
The best results come from the full process: spackle, dry, sand, wipe, prime, dry, and paint. Use the right primer, keep the coats thin, feather the edges, and let each layer dry before moving on.
A small patch may seem simple, but careful priming is what helps it blend into the wall instead of standing out after the paint dries.