
faucet aerator stuck: how to remove it safely
A faucet aerator stuck at the end of the spout is often held in place by mineral buildup, corrosion, overtightening, or an incorrect removal method. Start by identifying the aerator type, then use the least force possible. Try hand pressure and added grip before reaching for tools, and stop if the faucet itself moves or the aerator begins to deform.
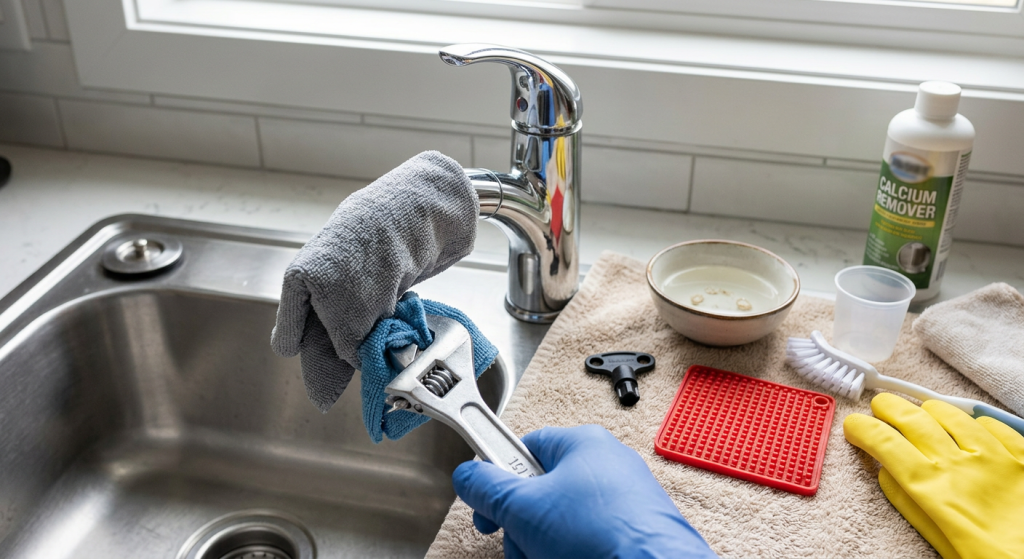
Identify the Aerator Before Trying to Remove It
The aerator is the small component at the faucet outlet that shapes the water stream and usually contains screens or flow-control components. Debris or mineral buildup inside it can contribute to weak or uneven flow.
Before trying to unscrew anything, determine what type of aerator you have.
Visible External Aerator
A traditional aerator looks like a small ring or housing attached to the end of the faucet spout. Its outer surface is visible and may provide enough grip for hand removal.
This is the style most homeowners picture when they think of a removable faucet aerator.
Recessed or Cache-Style Aerator
Many modern faucets use an aerator recessed inside the end of the spout. There may be no exposed housing to grip.
These aerators commonly require a matching aerator key that engages slots or tabs inside the recessed component.
Do not grab the surrounding faucet spout with pliers or insert a sharp object into the recessed aerator to pry it loose.
Manufacturer-Specific Insert
Some faucets use aerator or outlet assemblies that do not match either common style. Pull-down and specialty faucets can be especially different.
If you cannot clearly identify a removable aerator, check the faucet manufacturer’s information before applying tools. An unfamiliar outlet should not be forced simply because it resembles a threaded aerator.
How to Remove a Faucet Aerator Stuck in Place
The safest approach is to increase grip gradually without immediately increasing force. If the aerator does not respond at one stage, reassess before moving to a more aggressive method.
Step 1: Try Removing It by Hand
Dry the faucet spout and aerator completely. A wet chrome or finished surface can be surprisingly difficult to grip.
Hold the aerator housing firmly and try to unscrew it with controlled hand pressure.
Avoid twisting the faucet spout or body while you work. The force should be applied to the removable aerator, not transferred through the entire faucet.
If it does not move with reasonable hand pressure, stop and improve your grip rather than simply twisting harder.
Step 2: Use a Dry Cloth for Better Grip
Wrap a clean, dry cloth around an exposed aerator.
The cloth can improve grip while also providing some protection for the faucet finish. Try again using controlled pressure.
Watch the faucet while you turn the aerator. If the spout, faucet body, or base begins moving with your hand, stop.
Do not use the faucet body as leverage.
Step 3: Try a Rubber Grip
A rubber grip can provide more traction without immediately introducing metal tools.
Use a rubber jar-opening pad, rubber strap, or similar non-marring gripping material around an exposed aerator and try gentle, steady pressure.
This can be especially useful when the problem is limited grip rather than severe corrosion or thread damage.
If the aerator remains completely immobile, do not continue increasing force indefinitely.
Step 4: Use the Correct Key for a Recessed Aerator
If the aerator sits inside the faucet spout, determine whether it requires a dedicated aerator key.
Use a key that correctly fits the aerator’s slots or engagement points. A poorly fitting key can slip and damage the component.
Apply controlled turning pressure while keeping the key properly seated.
If the slots begin to strip, deform, or break, stop. Do not substitute screwdrivers, picks, knives, or other sharp tools to pry the recessed aerator from the faucet.
Once its engagement points are damaged, removal can become substantially more difficult.
Step 5: Address Mild Mineral Buildup
White, chalky, or crusty deposits around an exposed aerator can indicate mineral buildup that may be contributing to the problem.
For compatible faucet materials and finishes, vinegar can help soften mild mineral scale. However, vinegar should not automatically be used on every decorative or specialty finish.
Check the faucet manufacturer’s care guidance if the finish is delicate, unusual, or unknown. Avoid prolonged exposure when compatibility is uncertain.
After addressing accessible mineral deposits, dry the area and try the least aggressive removal method again.
Do not introduce penetrating chemicals, heat, or harsh cleaners in an attempt to free the aerator.
Step 6: Use a Protected Hand Tool Only if Appropriate
If you have a conventional exposed aerator that is clearly designed to unscrew and gentler methods have failed, limited tool assistance may be appropriate.
First protect the finished aerator surface with a cloth or other non-marring barrier. Position the tool carefully and use only enough pressure to maintain a secure grip.
Do not put bare metal jaws directly against a decorative finish.
Just as importantly, do not squeeze aggressively. Excessive gripping force can crush or deform the aerator before the threads ever begin moving.
Use controlled turning pressure rather than a sudden pull.
If substantial force appears necessary, stop. A badly corroded or seized component is no longer a good candidate for increasingly aggressive beginner removal attempts.
Stop if the Faucet Body Starts Moving
One of the most important warning signs during aerator removal is movement somewhere other than the aerator.
If the faucet spout, body, or base begins turning or shifting, stop immediately.
Do not hold one part of the faucet and use the rest of the fixture as leverage for greater force.
Movement can stress:
- Faucet mounting hardware
- Supply connections beneath the sink
- Internal faucet joints
- Seals and other components
If movement is accompanied by moisture around the fixture, the problem has moved beyond a stuck aerator. Faucet Leaking at Base: What to Check First explains how to trace that separate leak source before tightening or disassembling anything.
Avoid Damaging the Aerator or Spout Threads
The aerator and faucet spout rely on compatible threads to attach securely.
Excessive removal force can deform the aerator, damage its threads, or damage the faucet’s threads. That can turn a cleaning or replacement job into a more involved faucet repair.
Stop if you notice:
- The aerator housing crushing or changing shape
- Pieces beginning to break away
- Threads appearing damaged
- A tool repeatedly slipping
- A recessed aerator’s key slots stripping
- The faucet moving instead of the aerator
Do not respond by tightening the tool harder.
Corrosion deserves similar caution. If parts are heavily corroded rather than simply covered with surface mineral deposits, forcing them apart can cause unexpected breakage.
Clean and Inspect the Aerator After Removal
Once the aerator is removed, keep track of how its screens, washer, seal, and other removable pieces are arranged.
Rinse away loose debris. Mild mineral deposits may be cleaned using a method compatible with the aerator materials and the faucet manufacturer’s care instructions.
Inspect the screens for debris and check the washer or seal for obvious deterioration or damage.
If the aerator itself is damaged, replacement may be more practical than trying to reuse distorted components. Match the replacement to the faucet and thread style rather than assuming every aerator is universal.
A clogged aerator can contribute to weak flow from one faucet. If cleaning or removing the aerator does not correct the problem, Low Water Pressure in One Faucet: Causes and Fixes covers the broader diagnostic path without assuming the aerator is responsible.
Reinstall the Aerator Gently
Make sure the aerator components and seal are correctly positioned before reinstalling the assembly.
Start the threads carefully by hand. The aerator should engage smoothly rather than requiring force immediately.
If it starts crooked or binds, back it off and try again. Forcing misaligned threads can damage both the aerator and faucet spout.
For many standard threaded aerators, hand-tight installation is sufficient to seat the component without making future removal unnecessarily difficult. Follow manufacturer guidance if your faucet uses a different attachment method.
After reinstalling the aerator, run the faucet and check the stream. Look around the aerator connection for leakage.
If water escapes around the connection, shut the faucet off and inspect the aerator’s alignment, threads, washer, or seal rather than immediately overtightening it.
What Not to Do With a Stuck Faucet Aerator
A stuck aerator is a small problem that can become an expensive one when excessive force is applied.
Avoid:
- Starting with pliers when hand methods have not been tried
- Using bare metal jaws on decorative faucet finishes
- Crushing the aerator to gain more grip
- Prying out a recessed aerator with sharp tools
- Applying heat to the faucet
- Using unverified penetrating chemicals
- Forcing heavily corroded components
- Continuing when the faucet body moves
- Tightening an aerator excessively during reinstallation
More force is not always the next step. Sometimes resistance indicates that you have the wrong removal method, the wrong key, or an aerator that needs professional attention.
When to Call a Plumber
Stop and consider qualified plumbing help if the faucet body moves when you attempt removal, the aerator begins crushing or breaking, or the faucet or aerator threads appear damaged.
Professional help is also appropriate when a recessed aerator’s engagement slots have stripped, corrosion is severe, the faucet begins leaking, or removal would require more force than you can apply in a controlled way.
A stuck component is usually less expensive to address before aggressive removal damages the faucet body, mounting, or supply connections.
Final Thoughts
When dealing with a faucet aerator stuck in place, identify the aerator type before choosing a removal method. Start with dry hand pressure, improve your grip with a cloth or rubber material, and use the correct key when the aerator is recessed. Mineral buildup may justify a gentle, finish-compatible cleaning step before another attempt.
Protect the faucet finish and stop if the aerator deforms, the threads begin failing, or the faucet itself moves. The goal is not simply to make the aerator turn—it is to remove it without creating a larger faucet repair.