
shower door sweep replacement: how to choose the right fit
Shower door sweep replacement starts with identifying the door and existing seal, then matching its attachment method, dimensions, and orientation before buying a new part. Length alone is not enough. A frameless push-on sweep may need the correct glass thickness and bottom clearance, while a framed door may use a specific insert profile or drip-rail assembly. Once the part is confirmed, a simple accessible sweep can often be replaced without removing the door.
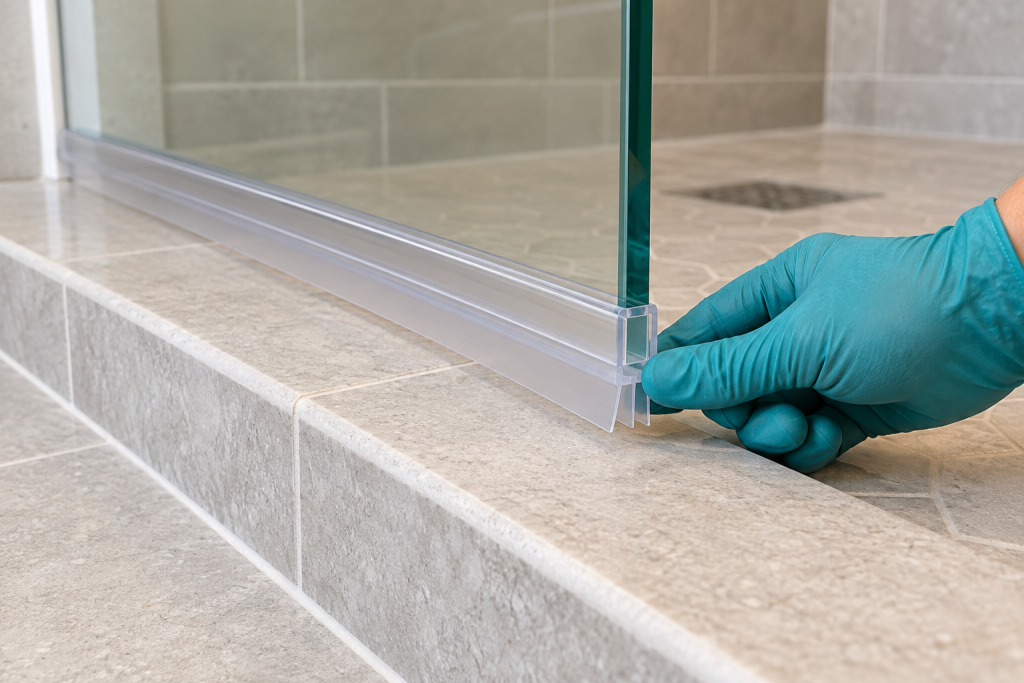
What a Shower Door Bottom Sweep Does
A bottom sweep helps manage water at the gap between the moving shower door and the threshold, curb, or track. Depending on the design, flexible fins or blades contact or closely approach the surface below, while a drip rail may direct water back toward the shower.
Consider replacement when the existing sweep is:
- Split, torn, or brittle
- Missing sections
- Permanently deformed
- No longer staying attached
- Creating a visible gap it previously covered
- Dragging because part of the seal has folded or shifted
- Allowing water past a location where the original sweep previously worked
A new sweep will not correct every shower-door leak. A sagging door, incorrect alignment, damaged hardware, failed frame joint, blocked drainage path, or leakage from somewhere other than the bottom seal needs a different solution.
Stop before working on the sweep if the glass is chipped or cracked, the door feels loose or unstable, hardware is moving, or the door sags or binds. Do not remove the glass door, adjust hinges or rollers, or modify tempered glass as part of this repair.
Know Which Seal You Are Replacing
Several pieces around a shower door may look like “weatherstripping,” but they do different jobs.
A bottom sweep sits at the lower edge of a moving door and helps control water at the threshold.
A drip rail projects toward the wet side so water running down the glass is directed back into the enclosure. On some frameless sweeps, the drip rail and flexible bottom fins are formed into one push-on profile.
A side seal closes or reduces gaps along a vertical glass edge or frame. It is not automatically interchangeable with a bottom sweep.
A magnetic seal uses mating magnetic profiles to help two door edges meet and remain closed. Replacing one may require matching the angle and mating profile, not simply its length.
Framed and frameless doors also commonly use different attachment arrangements. A frameless swinging door may have a rigid clear channel that pushes directly over the bottom edge of the glass. Framed doors can instead use a vinyl sweep that slides into a slot or channel in the bottom door extrusion. Other doors use manufacturer-specific attached assemblies.
Do not force a seal to move in a direction simply because another style slides off that way. Identify how your existing part is retained first.
How to Identify the Correct Replacement
Whenever possible, start with the shower-door manufacturer and model rather than shopping by appearance.
Check original paperwork, installation instructions, receipts, product labels, or model information associated with the enclosure. Manufacturer service-parts diagrams can identify whether the bottom component is a sweep, threshold seal, wipe, or another model-specific part.
If you cannot identify the exact door, document the existing sweep before removing it. Take clear photos from the end and side, including the attachment channel, flexible fins, drip rail, and orientation toward the inside of the shower.
For shower door sweep replacement, these measurements may matter:
- Existing sweep length
- Glass thickness for a push-on glass channel
- Width and shape of an insert that fits a framed extrusion
- Door-to-threshold or door-to-track clearance
- Length and position of flexible fins or blades
- Drip-rail shape and direction
- Distance needed at the strike or closing edge
- Door swing and inside/outside orientation
Not every measurement applies to every door. A framed insert may depend mainly on its profile and blade dimensions, while a frameless sweep can depend heavily on glass thickness and bottom clearance.
Do not remove a glass door merely to measure its thickness. Use the door specifications, an safely accessible exposed glass edge, or manufacturer documentation where possible.
Shower Door Sweep Replacement Fit Check
| What to check | Why it matters | Most relevant to |
|---|---|---|
| Attachment profile | Determines how the seal connects | All sweeps |
| Glass thickness | Push-on channel must grip correctly | Frameless glass |
| Insert/profile width | Must fit the existing extrusion | Framed doors |
| Sweep length | Must cover the intended door edge | All sweeps |
| Bottom clearance | Controls contact and drag | Bottom wipes/fins |
| Fin or blade size | Affects threshold contact | Flexible sweeps |
| Drip direction | Sends runoff toward the wet side | Drip-rail styles |
| Model/part match | Confirms design compatibility | Manufacturer parts |
Do not choose a replacement solely because its advertised length matches. A sweep that is too loose on the glass can fall off, while one intended for thicker glass may not install correctly. A fin that extends too far can drag heavily and interfere with normal door movement.
How to Replace a Simple Shower Door Sweep
This procedure is limited to an accessible sweep that is intended to be serviced while the door remains installed. If the manufacturer requires door removal, hinge work, frame disassembly, or another glass-handling procedure, stop and use qualified shower-door or glass service.
- Inspect the door before touching the sweep. Open and close the door gently and verify that the glass appears sound, the hardware is stable, and the door operates normally apart from the worn seal. Stop for chipped or cracked glass, sagging, binding, loose hinges or rollers, or movement that suggests the door itself needs adjustment rather than a new sweep.
- Document the existing part and orientation. Before removing anything, photograph the bottom sweep from both ends and from the wet and dry sides. Note which way any drip rail faces, where the sweep ends relative to the closing edge, and whether an intentional gap or notch is present. Preserve manufacturer-designed drainage openings rather than treating every gap as something to eliminate.
- Confirm the attachment method. Determine whether the part pushes directly over frameless glass, slides into an extrusion slot, fits into a rail, or uses another documented attachment. Follow the exact removal direction for that design. If the profile resists normal removal, stop and confirm the part diagram instead of prying against the glass or pulling harder.
- Remove the worn sweep carefully. Support only the sweep itself and keep hard or metal tools away from exposed tempered-glass edges. Do not lever against the glass. Never cut, drill, grind, sand, or otherwise modify tempered glass to make a replacement fit.
- Clean the accessible mounting area. Remove ordinary residue from the glass edge, channel, or frame using a method compatible with the door’s glass coating, metal finish, and replacement seal. Do not assume a solvent, abrasive scraper, lubricant, adhesive remover, or soaking treatment is safe. The replacement needs a clean attachment area without damage to nearby finishes or components.
- Size the replacement only when permitted. Some replacement sweeps are supplied precut, while others are intentionally longer so they can be trimmed to the door width. Trim only if the manufacturer allows it. Remove the replacement from the glass before cutting; use the specified tool and end-clearance guidance, and preserve any required notch, cap, fin, or deflector. Never cut an installed sweep with a blade against the glass.
- Install the sweep in the specified orientation. Press, slide, or attach the replacement using the method intended for that profile. Keep a drip rail or deflector facing the direction shown for the door, normally so it directs runoff toward the wet side where specified. Do not add silicone, adhesive, lubricant, or heat unless the exact replacement instructions require it.
- Check door movement before using the shower. Open and close the door gently several times. The sweep should remain attached and should not create excessive drag, prevent normal closing, catch on the threshold, or place noticeable stress on the door. If it does, stop and recheck the part number, clearance, profile, and orientation instead of trimming flexible fins to compensate for a poor match.
- Observe any required waiting period and test normal use. If the specific sweep or attached assembly uses an approved adhesive or sealant, observe its stated cure or water-exposure time. Then use the shower normally and check whether water containment has returned to the expected level. Do not create an artificial test by directing a forceful shower stream at door seams.
For routine glass care beyond the sweep’s mounting area, see our guide on how to clean glass shower doors.
If the New Sweep Still Leaks
A correctly fitted sweep can improve water control at the bottom of a door, but shower enclosures are not all designed to be completely watertight under every spray condition.
First, determine whether water is actually passing the new sweep. Look for the path during ordinary shower use rather than assuming any puddle near the door started at the bottom edge.
A sweep is unlikely to solve leakage caused by:
- Door misalignment or sagging
- Loose or damaged hinges or rollers
- A failed side or magnetic seal
- Water escaping at a frame joint
- Blocked threshold drainage or weep openings
- A damaged threshold or enclosure component
- Water reaching the door from an unintended spray direction
- A separate caulk-joint failure around the enclosure
Do not seal drainage channels or weep holes to stop a leak. Likewise, adding caulk around a poorly fitting sweep does not make the wrong replacement part compatible.
If the door has changed position, contacts the threshold abnormally, or requires hinge, roller, or frame adjustment, move beyond DIY sweep replacement and have the enclosure serviced.
If you identify a separate failed caulk joint on otherwise sound surfaces, our guide on how to caulk a shower or bathtub covers that repair. Do not use caulk to compensate for a poorly fitting sweep or block drainage openings.
Buying Checklist for a Replacement Sweep
Before ordering, confirm:
- Shower-door manufacturer and model, when available
- Original or approved replacement part number
- Framed or frameless door construction
- Push-on, slide-in, or other attachment profile
- Glass thickness when the channel mounts directly to glass
- Existing insert dimensions for framed profiles
- Required sweep length
- Door-to-threshold clearance
- Fin or blade dimensions
- Drip-rail direction
- Door swing or handing requirements
- Whether trimming is permitted
- Any required end gaps, notches, or caps
- Whether adhesive or other installation material is specified
When the original manufacturer still provides a service-parts diagram, matching the door to its intended replacement is usually more reliable than trying to find a generic seal with similar dimensions.
Final Thoughts
Shower door sweep replacement is mainly a fit problem rather than a length problem. Identify the door and existing seal first, then compare the attachment profile, glass or channel dimensions, bottom clearance, fin configuration, and drip direction before buying.
For a sound, stable door with a simple serviceable sweep, replacement can be a manageable homeowner repair. Stop if the glass or hardware is damaged, the door needs adjustment, or the replacement requires removing the door. A correctly fitted sweep can restore normal water control at the bottom edge, but it cannot repair other enclosure or alignment problems.