
mouse droppings: how to identify them and what to do safely
Mouse droppings are a common sign of rodent activity, but appearance alone cannot always confirm exactly what left them. If you find likely droppings, keep children and pets away, avoid touching or disturbing them while dry, and do not sweep or vacuum. For a small accessible area, use a cautious wet-cleaning and disinfection approach and then monitor for new signs.
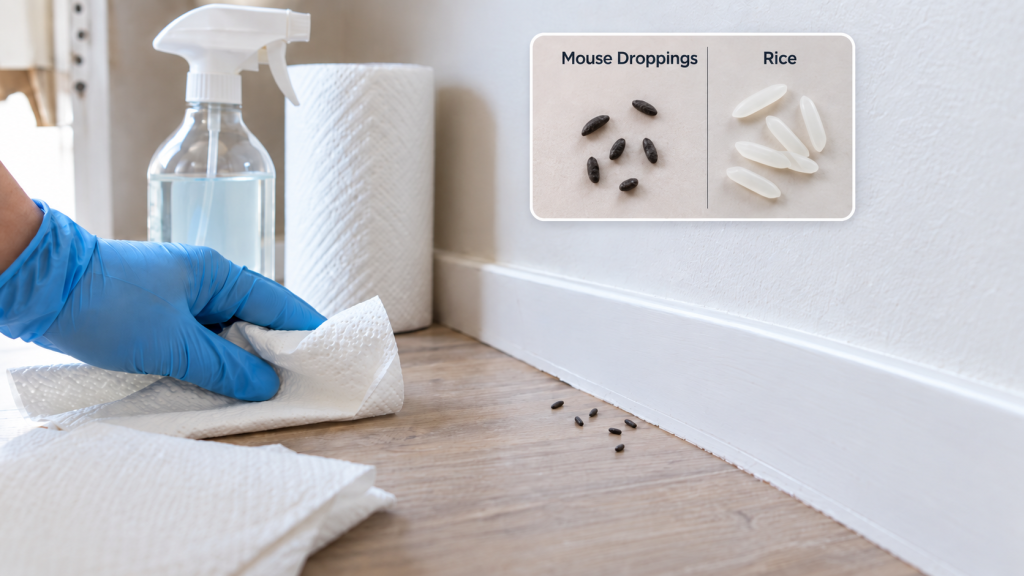
What Mouse Droppings Usually Look Like
Mouse droppings are typically small, dark, pellet-like pieces that may taper or come to a point at one or both ends. They are often found in groups or scattered along the routes mice use while moving between shelter and food.
Fresh droppings may look darker, shinier, or softer-looking. Older droppings can become duller, lighter, dry, or brittle.
Those differences are only clues. Color, size, and texture can vary, and you should not touch, crush, or break apart droppings to judge their age. Appearance alone also cannot tell you exactly when they were deposited.
If you are unsure what the material is, treat it cautiously until you can identify it more confidently.
Where Mouse Droppings Are Commonly Found
Mice tend to move along walls, edges, and protected routes, so droppings often appear in places that are quiet or partly hidden.
Common locations include:
- Kitchen cabinets and pantry areas
- Beneath sinks
- Behind or beside appliances
- Along baseboards
- Garages and basements
- Utility rooms
- Storage areas
- Near pet-food storage
- Along walls and corners
- Near suspected entry points
The location matters. Droppings inside a food cabinet create a different cleanup concern than a few droppings on an accessible garage floor, even though both deserve careful handling.
If droppings are appearing near suspected entry points, see how to keep mice out of your house by checking common access routes and reducing the conditions that encourage them to stay.
Mouse Droppings vs. Other Household Signs
Droppings can be confused with other pest signs or ordinary debris, so avoid identifying the source from one feature alone.
Mouse droppings vs. rat droppings
Rat droppings are generally larger than mouse droppings, but size alone is not a perfect identifier. Age, breakage, and the species involved can make visual comparisons less certain.
If the droppings are unusually large or widespread and you are unsure whether mice or rats are involved, closer pest identification may be worthwhile.
Mouse droppings vs. cockroach droppings
Cockroach droppings can look like pepper, coffee grounds, dark smears, or very small pellets depending on the type of cockroach and the location.
That can make small insect debris easy to confuse with rodent signs at a glance.
Mouse droppings vs. ordinary debris
Seeds, crumbs, dirt, insect fragments, and bits of insulation or building material can also resemble droppings.
Look at the overall pattern rather than one isolated object. Repeated pellets along walls, food damage, gnawing, nesting material, or other rodent signs make mouse activity more plausible.
Do Not Sweep or Vacuum Dry Mouse Droppings
Do not sweep, vacuum, blow, or otherwise stir up dry rodent droppings or contaminated nesting material.
Dry cleaning methods can send contaminated dust and particles into the air. Compressed air and shaking contaminated items indoors can create the same problem.
For a small accessible area, the safer approach is to wet the droppings thoroughly with an appropriate disinfectant before wiping them up.
If contamination is widespread, heavy, or located in an enclosed or poorly ventilated area, stop and consider professional cleanup rather than treating it like ordinary household dust.
What to Do Before Cleanup
Prepare the area before touching anything.
Keep people and pets away
Prevent children and pets from entering the contaminated area while you prepare and clean.
Avoid direct contact with droppings, nesting material, or visibly contaminated surfaces.
Ventilate when practical and safe
For an enclosed room, garage, shed, or similar space, open doors and windows when practical and allow fresh air to circulate before cleaning. Leave the area while it airs out rather than stirring up material during ventilation.
Do not enter an unsafe crawlspace, attic, wall cavity, or other hazardous area simply to ventilate or inspect rodent contamination.
Gather supplies first
Have disposable paper towels or similar disposable material, rubber or plastic gloves, a suitable waste bag, and an appropriate household disinfectant ready before you begin.
Use a disinfectant according to its label directions. Never mix household cleaners or disinfectants.
How to Clean Up a Small Amount of Mouse Droppings Safely
Use this sequence for a small amount of droppings in an accessible area that does not involve widespread contamination.
Step 1: Put on disposable gloves
Wear rubber or plastic gloves before handling contaminated material or applying disinfectant.
Step 2: Leave the droppings undisturbed while dry
Do not sweep, vacuum, brush, or use compressed air on the material.
Step 3: Wet the droppings thoroughly
Apply an appropriate household disinfectant until the droppings and immediately surrounding area are thoroughly wet.
Use the product only as directed. Do not mix cleaners or make stronger solutions than the label calls for.
Step 4: Allow the required contact time
Leave the disinfectant on the surface for the contact time stated on the product label.
The surface needs to remain wet for the product to be used as intended.
Step 5: Wipe up the material
Use disposable paper towels or similar disposable material to pick up the wet droppings and residue.
Avoid actions that scatter material beyond the immediate area.
Step 6: Bag the waste
Place the used cleanup material in a suitable bag and seal it before disposal according to normal local waste practices.
Step 7: Clean and disinfect the area
After the visible material is removed, clean and disinfect the surrounding hard surface according to the product directions.
Step 8: Remove gloves carefully
Avoid touching the outside of the gloves with bare skin as you remove them.
Step 9: Wash your hands
Wash your hands thoroughly with soap and water after the gloves are removed.
Cleaning Hard Surfaces
Hard, nonporous surfaces such as finished floors, shelves, cabinet interiors, and counters are generally easier to clean than porous materials.
After wetting and removing the droppings, clean and disinfect the affected hard surface according to the disinfectant label.
In food-storage or preparation areas, keep disinfectants away from exposed food and follow any label directions about rinsing food-contact surfaces before reuse.
What About Porous Materials?
Cardboard, fabric, paper, insulation, and unfinished or absorbent materials can be harder to clean thoroughly because contamination can penetrate below the surface.
A lightly affected washable item may be suitable for laundering or cleaning according to appropriate material-care guidance. Contaminated cardboard or other low-value porous material may be easier to discard than to clean.
Heavily contaminated insulation, large porous surfaces, or materials inside inaccessible spaces are different. Do not open walls or undertake large-scale removal of contaminated insulation as a routine DIY cleanup. Professional evaluation may be more appropriate.
Mouse Droppings Near Food or Dishes
Droppings in a kitchen, pantry, or food-storage area require extra attention to possible contamination.
Discard food that is visibly contaminated or that may have been directly exposed. Inspect nearby packaging for damage and avoid using packages that have been gnawed, opened, or contaminated.
Clean and disinfect affected shelves, cabinet interiors, or counters before putting food back.
Wash dishes, utensils, or food containers that may have been exposed before using them again, following normal washing guidance appropriate for the item.
Check Whether Mouse Activity Is Still Ongoing
Cleanup tells you what was present. Monitoring afterward can help show whether mice are still active.
Watch for:
- New droppings after the area has been cleaned
- Fresh gnaw marks
- Newly damaged food packaging
- Scratching or movement sounds
- New nesting material
- Mouse sightings
New droppings appearing in a previously cleaned area are a stronger sign of current activity than trying to judge the age of old droppings by appearance alone.
After cleanup, secure accessible food, reduce clutter where practical, and inspect likely mouse entry areas separately. Mouse exclusion is a different task from contaminated-area cleanup.
For broader pest prevention after cleanup, our whole-home guide explains how to keep bugs out by reducing food, moisture, shelter, and common entry points.
When the Amount of Droppings Changes the Response
A few droppings in one accessible location are not the same cleanup problem as heavy contamination throughout a basement, attic, garage, or storage area.
Professional pest-control or cleanup help may be appropriate when:
- Droppings are widespread or heavily concentrated
- The area is poorly ventilated
- Contamination extends into inaccessible cavities
- Large amounts of insulation or porous material are affected
- Cleanup would disturb substantial contaminated material
- Rodent activity appears extensive inside structural spaces
- Reaching the area would require unsafe crawlspace, ladder, or demolition work
Heavy contamination may require precautions beyond ordinary household cleanup. Do not expand a small cleanup procedure into a large remediation project.
If someone has health concerns after rodent exposure, contact a healthcare professional and explain the exposure. This article cannot determine whether an illness is related to rodents.
Final Thoughts
If you find likely mouse droppings, the safest first move is to avoid disturbing them while dry. Keep children and pets away, ventilate when appropriate, wear gloves, thoroughly wet the material with an appropriate disinfectant, wipe it up, disinfect the immediate area, and wash your hands afterward.
Then monitor the cleaned area. New droppings or other fresh signs suggest mouse activity is continuing and the underlying access problem still needs to be addressed separately. Widespread or inaccessible contamination is a good reason to bring in professional help rather than turning routine cleanup into a large DIY remediation job.