
how to caulk a shower or bathtub
How to caulk a shower correctly starts with removing the failed bead, preparing a clean, dry, sound joint, and applying a wet-area sealant that is compatible with the surrounding materials. Tool the new bead within the product’s working time, then keep it dry for the specified water-exposure period. Recaulking is appropriate only when the joint and surfaces underneath are otherwise sound.
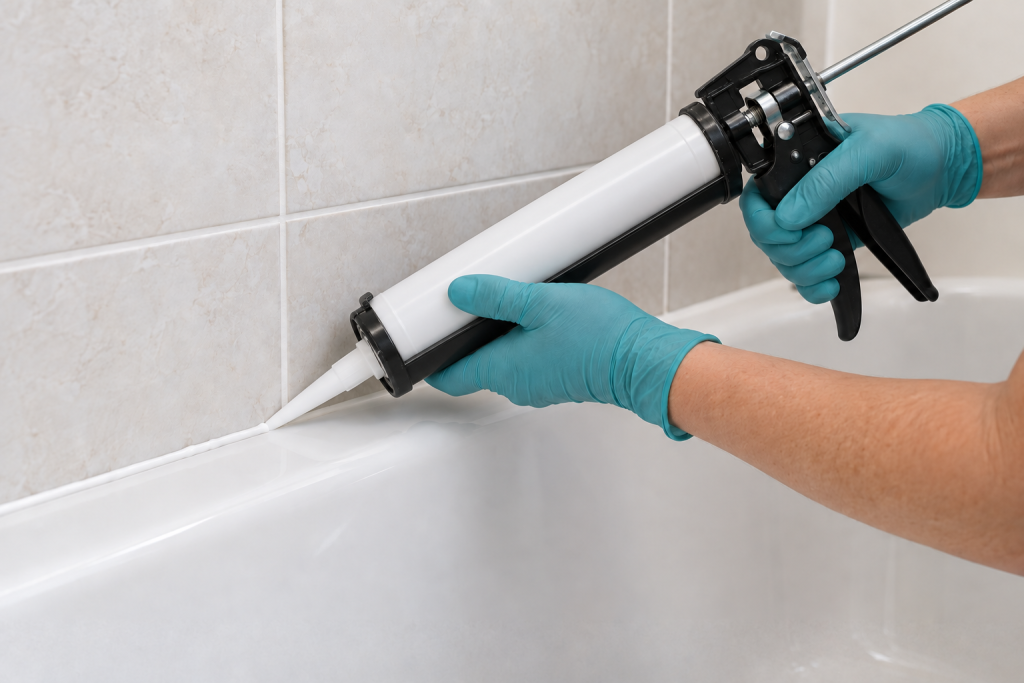
When Routine Recaulking Is Appropriate
A worn caulk bead is a reasonable beginner project when it is accessible and the surrounding tub, shower base, tile, wall panel, or enclosure is firm and undamaged.
Typical signs that a bead may need replacement include:
- Caulk pulling away from one side of the joint
- Cracks or gaps through the bead
- Sections that have become loose or brittle
- Localized staining or surface growth that cannot be resolved without removing failed caulk
- Missing sealant at a joint that the fixture or enclosure manufacturer specifies should be sealed
Caulk is a flexible joint material, not a substitute for the shower’s waterproofing system. Stop if removing the old bead reveals persistent dampness, recurring growth behind it, loose tile or panels, soft backing, rot, significant deterioration, or unexplained movement.
An unusually large or deep opening also deserves investigation rather than a thick bridge of caulk. Do not stuff paper, cloth, foam scraps, or other household materials into a gap. Some sealants call for a specific backer rod at particular joint dimensions, but that should follow the sealant instructions and make sense for the original joint design.
In tiled showers, flexible sealant and grout have different jobs. Changes of plane—such as a wall-to-wall corner or the transition between tile and a tub or shower base—need to accommodate movement. Do not spread caulk across an otherwise sound grout grid or replace sound grout indiscriminately.
Shower-door and enclosure joints require extra care. The manufacturer may specify exactly which inside or outside seams receive sealant and which must remain open for drainage. Never cover weep holes, drainage channels, or intentionally unsealed areas simply because an opening looks unfinished.
Keep access safe while you work. Do not stand on a shower curb, chair, loose object, or slippery tub surface to reach a joint.
If you find visible mold, consult our guide to removing mold from shower surfaces safely before deciding whether cleanup and recaulking are appropriate.
Choose the Right Sealant and Supplies
Choose a sealant explicitly labeled for the wet-area application you have and verify that it is compatible with every material it will contact.
A product suitable for ceramic tile may not automatically be appropriate for natural stone, acrylic, fiberglass, coated metal, painted surfaces, or a particular shower enclosure. Some silicones are formulated to avoid staining certain stone or metal finishes, while other sealants have different compatibility limits.
For an ordinary shower or tub joint, wet-area performance and material compatibility matter more than paintability. Many 100% silicone bathroom sealants are not paintable. Paintable bathroom sealants also exist, but that does not make them interchangeable with every silicone product.
Your supplies may include:
- Compatible kitchen-and-bath or tub-and-tile sealant
- Caulk gun if using a cartridge
- Plastic caulk-removal tool or finish-safe scraper
- Soft cloths or paper towels
- Manufacturer-approved surface cleaner
- Painter’s tape if desired
- Caulk finishing tool if permitted by the sealant instructions
- Appropriate gloves
- Backer rod only when the product instructions and joint dimensions call for it
A blade can damage acrylic, fiberglass, coated surfaces, and other easily scratched materials. Favor plastic or other finish-safe removal tools unless the surface manufacturer specifically allows a blade. If a blade is appropriate for a hard surface, keep it shallow and controlled; do not push it deep behind the joint where it could damage concealed waterproofing or other components.
Chemical caulk removers are also material-specific. A remover designed for latex caulk may not work on silicone, and some removers can affect plastics, coatings, fiberglass, or refinished surfaces. Check compatibility and follow the remover’s instructions for cleaning away residue before applying new sealant.
Never mix cleaning products. In particular, do not mix bleach with ammonia, vinegar, or other acids. Do not layer cleaners or solvents over residues from another product. When changing products, follow the labels for rinsing, ventilation, drying, and separation.
If significant or recurring mold is present rather than a small surface issue, do not seal over it. Address the moisture and mold problem before recaulking.
How to Caulk a Shower Step by Step
- Confirm where the joint is supposed to be sealed. Identify the failed bead and check any available tub, shower base, wall-panel, or enclosure instructions before removing it. Pay particular attention to shower-door thresholds and frames, because some designs require sealant only at specific seams while leaving other areas open for drainage. Mark or photograph the existing approved seal locations if that will help you reproduce them accurately.
- Choose the compatible sealant and read its instructions. Confirm that the product is intended for showers, tubs, or comparable wet-area use and that it bonds to the materials on both sides of the joint. Read the application temperature, joint-size, tooling, cleanup, water-exposure, and cure information before starting so you do not discover an important restriction after the bead is already applied.
- Remove the failed caulk without damaging the surfaces. Loosen and lift away the old bead with a plastic caulk-removal tool or another method approved for the surrounding material. Remove interfering film and loose residue rather than laying fresh caulk over a failed layer. On scratch-prone acrylic, fiberglass, coated metal, and similar surfaces, avoid casual use of razor blades or aggressive scrapers. Never drive a cutting tool deeply behind the visible joint.
- Clean the joint and remove compatible residues. Follow the new sealant manufacturer’s surface-preparation instructions. Remove soap film, dirt, grease, old sealant residue, and any compatible remover residue that could interfere with adhesion. Use solvents such as isopropyl alcohol only when the sealant and surface instructions permit them. If you encounter persistent moisture or recurring growth behind the removed bead, stop instead of covering the condition with new sealant.
- Let the joint dry as required and inspect it. The surfaces must be sound and meet the sealant’s drying requirements. Drying time after cleaning varies with the materials, cleaner, temperature, and ventilation. Before proceeding, check that the joint edges are firm, drainage openings remain clear, and no damage or persistent moisture is visible.
- Prepare the joint and nozzle. Install specified backing material only when required for the joint dimensions. If using painter’s tape, leave the intended bonding surfaces exposed. Cut the nozzle to the bead size and angle specified by the sealant instructions. For a cartridge, pierce any inner seal as directed, then load it into the caulk gun according to the gun’s instructions. Keep the opening small enough to control the flow while still filling the joint properly.
- Apply a steady, continuous bead. Hold the nozzle at the angle recommended by the product instructions and move along the joint at a controlled pace while applying consistent pressure. The goal is to fill the intended joint and make contact with both sides without piling excessive material on the surface. Work in sections if necessary so you can tool the sealant before its working time expires.
- Tool the bead using the approved method. Smooth the fresh sealant enough to create continuous contact and a clean profile. Use the tooling method specified by the manufacturer, which may involve a finishing tool or a gloved finger. Do not treat saliva, a bare wet finger, dish-soap solution, or another homemade lubricant as a universal technique. If you used masking tape, remove it within the product’s permitted working time and before skin formation when the instructions require that timing.
- Allow the required waiting time, then inspect the bead. Keep the sealant undisturbed and dry until the manufacturer permits water exposure under your application conditions. Water-ready time may come before full cure; continue observing any separate restrictions on cleaning or other use. Before using the shower or tub, visually check for voids, lifted edges, and blocked drainage openings without pressing on the fresh sealant. Check again after normal use for separation or visible leakage. A neat bead does not prove that concealed waterproofing is sound.
The practical goal when learning how to caulk a shower is not to create the largest possible bead. It is to produce a correctly placed, well-adhered flexible joint without damaging the surfaces or interfering with the way the shower assembly manages water.
How Long Before You Can Use the Shower or Tub?
Use the waiting time printed for the exact sealant and the conditions under which you applied it. There is no reliable universal “wait 24 hours” rule.
Several different times may appear on a sealant label or technical sheet:
- Working or tooling time: How long you have to shape the bead after application.
- Skin or tack-free time: When the exposed surface begins forming a film or stops feeling tacky.
- Water-ready or return-to-service time: When the manufacturer permits specified water exposure.
- Full cure: When the sealant has completed the curing period described by the manufacturer.
These terms are not interchangeable. A product can be approved for water exposure before it reaches full cure, and the stated water-ready time may depend on bead size, temperature, humidity, or other conditions.
Follow whichever restrictions apply to your installation rather than using the shortest time you see on another bathroom caulk.
Common Caulking Mistakes and Final Checks
A few mistakes account for many disappointing recaulk jobs.
Applying over failed caulk: New sealant needs the surface preparation specified by its manufacturer. Loose, dirty, moldy, or poorly adhered old material should not become the foundation for the replacement bead.
Using the wrong sealant for the surface: “Kitchen and bath” on the package does not automatically establish compatibility with every stone, plastic, finish, or enclosure material.
Cutting the nozzle too large: A large opening can deposit more sealant than the joint needs, making the bead harder to control and tool.
Waiting too long to tool or remove tape: Sealants have limited working and skinning times. Tooling a bead after the surface has begun to set can leave rough edges or disturb adhesion.
Sealing drainage paths: Do not assume every seam around a shower-door frame should be filled. Follow the exact enclosure instructions and preserve weep holes or required wet-side openings.
Using the shower too soon: Observe the stated water-exposure conditions even if the bead feels dry on the surface.
After the sealant has reached the appropriate stage for use, examine the entire repair. The bead should remain attached along both edges without visible holes, separated sections, or fresh leakage around the joint.
If the new caulk pulls away quickly, the surfaces move, moisture repeatedly appears from behind the joint, or surrounding material becomes soft or loose, stop recaulking. Those conditions point beyond routine maintenance.
Use our bathroom cleaning checklist to include periodic checks of caulk joints in your ongoing maintenance routine.
Frequently Asked Questions
Can I put new shower caulk over old caulk?
Normally, failed caulk and residue that interfere with adhesion should be removed before the replacement is applied. Do not cover loose, dirty, moldy, cracked, or detached sealant with another bead. Follow the new sealant manufacturer’s preparation requirements because specialty products designed for a particular renewal system may have different instructions.
Should I caulk over grout in a shower?
Not across the general grout grid. Grout fills the ordinary joints between tiles, while flexible sealant is used where movement must be accommodated, including specified changes of plane and transitions to fixtures. If grout at a normal tile joint is failing, coating the entire area with caulk is not a substitute for determining why that grout is deteriorating.
How long should shower caulk dry before getting wet?
Use the exact sealant’s water-ready or return-to-service instructions. Do not assume that 24 hours applies to every product. Also distinguish permission for water exposure from full cure, which may occur later. Temperature, humidity, bead size, and other stated conditions can affect the manufacturer’s timing.
Final Thoughts
Knowing how to caulk a shower is mainly a matter of preparation, compatibility, and timing. Remove the failed material carefully, make sure the exposed joint is clean, appropriately dry, and structurally sound, then apply and tool the correct wet-area sealant according to its instructions.
Stop if the old bead was hiding persistent moisture, widespread growth, loose surfaces, significant damage, or an unexplained oversized gap. Caulk can renew a sound movement joint, but it cannot repair failed waterproofing, concealed leaks, or damaged backing.